Category: Editorial

  • How to Connect a Printer to Windows over Wi-Fi

    How to Connect a Printer to Windows over Wi-Fi

    Let’s face it—dealing with printer cables can be a hassle. Setting up your printer over Wi-Fi? Way more convenient. These days, most modern printers come ready for wireless connectivity, and Windows does a pretty decent job guiding you through the process. Here’s a clear, human-friendly breakdown to help you get your printer talking to your computer over Wi-Fi.

    Why Connect a Printer Over Wi-Fi?

    Some solid reasons to go wireless:

    • No Wires, No Mess: Place your printer wherever you want, without worrying about cord lengths.
    • Shared Access: Everyone on the same network can use it—great for households or small teams.
    • Room to Move: Print from your kitchen, your couch, your patio, wherever.
    • It’s the Norm: Most printers today are built with Wi-Fi in mind.

    What You’ll Need First

    Before jumping in, make sure you have:

    • A Wi-Fi capable printer (look for a wireless symbol or check the specs).
    • A working Wi-Fi network and the SSID + password (usually on your router).
    • A Windows computer (Windows 10 or 11 works best).
    • Your printer’s manual just in case it does something funky.
    • Both devices powered on and ready.

    Step 1: Get the Printer on Your Wi-Fi

    This part happens directly on the printer:

    1. Find the Wireless Setup:
      • Use the printer’s screen or buttons to navigate to something like “Network Setup” or “Wireless Settings.”
    2. Start Wireless Setup Wizard:
      • Choose “Wireless Setup Wizard.” It scans for Wi-Fi networks.
    3. Pick Your Network:
      • Select your Wi-Fi name (SSID).
    4. Enter the Password:
      • Carefully type in the Wi-Fi password. It’s case-sensitive.
    5. Confirm Connection:
      • Once connected, you’ll usually see a confirmation message. If not, double-check the password and try again.

    Alternate Methods:

    • WPS: Press the WPS button on your router and the printer (if both support it).
    • USB Setup: Temporarily plug the printer into your PC with a USB cable and let the software do the Wi-Fi setup.

    Step 2: Add the Printer to Windows

    Once the printer is on Wi-Fi, here’s how to link it to your computer:

    1. Open Settings:
      • Click Start > Settings (gear icon), or press Windows + I.
    2. Go to Devices:
      • Click “Bluetooth & devices” (Windows 11) or “Devices” (Windows 10).
    3. Printers & Scanners:
      • Click this option.
    4. Add a Printer:
      • Click “Add device” next to “Add a printer or scanner.”
    5. Wait for Discovery:
      • Windows scans for printers. This might take a moment.
    6. Select Your Printer:
      • When it appears, click on it, then click “Add device.”
    7. Drivers Install:
      • Windows usually handles this automatically.
      • If not, go to the printer maker’s website, find your model, and download the driver package.
    8. Print a Test Page:
      • Right-click the printer in Settings > “Manage” > “Print a test page.”

    Troubleshooting Tips

    • Printer Not Found?
      • Confirm it’s connected to Wi-Fi and on the same network as your computer.
      • Restart printer, router, and computer.
      • Disable firewall temporarily to test.
      • Avoid guest networks; they often block printer discovery.
    • Jobs Get Stuck?
      • Open the printer queue and clear stuck jobs.
      • Restart the Print Spooler (search “services.msc” > find “Print Spooler” > Restart).
      • Update drivers from the manufacturer’s website.
    • Slow/Unstable Printing?
      • Move the printer closer to the router.
      • Keep it away from interference (microwaves, phones).
      • Try switching the router to a less crowded Wi-Fi channel.

    A Quick Story from Experience

    I still remember fighting with a wireless printer late at night—printer was connected, but Windows just wouldn’t see it. Turns out, my computer was on the 5GHz band while the printer only worked on 2.4GHz. They were technically on the same network but couldn’t find each other. Switching bands did the trick, and I was back to printing in minutes.

    Wrapping Up

    Wi-Fi printers can seem tricky at first, but once you get the hang of it, they’re incredibly freeing. No cables, no constant plugging and unplugging—just smooth, wireless printing from wherever you are. Follow these steps, and you should be printing in no time.

  • How to Add a Network Printer to Windows PC

    How to Add a Network Printer to Windows PC

    Adding a network printer to a Windows PC allows for shared access across devices without direct USB connections. This guide walks you through the essential steps and options for setting up a network printer in Windows.

    Prerequisites

    • Printer is powered on and connected to the same network as your PC.
    • Wired printers: connected via Ethernet.
    • Wireless printers: connected to the Wi-Fi.
    • PC is also on the same network.
    • Optional: Printer’s IP address and latest drivers from the manufacturer’s website.

    Method 1: Add Printer via Windows Settings

    1. Open Settings (Windows key + I).
    2. Go to Bluetooth & devices (Windows 11) or Devices (Windows 10).
    3. Click Printers & scanners.
    4. Select Add device.
    5. Wait for your printer to appear > Click Add device.

    If it works, print a test page to confirm setup.

    Method 2: Manual Setup with IP Address

    If automatic detection fails:

    1. Repeat steps 1–4 from Method 1.
    2. Click The printer that I want isn’t listed.
    3. Select Add a printer using a TCP/IP address.
    4. Enter your printer’s IP address (e.g., 192.168.1.150).
    5. Choose driver:
      • If detected: let Windows install it.
      • If not: use “Have Disk…” and navigate to downloaded driver files.
    6. Name your printer.
    7. Choose not to share (if it’s already network-shared).
    8. Print a test page > Click Finish.

    Method 3: Use Manufacturer’s Setup Software

    1. Visit your printer manufacturer’s website.
    2. Search for your printer model.
    3. Download full driver/software package.
    4. Run the installer and follow guided steps.

    This often includes scanning utilities and advanced settings.

    Troubleshooting

    • Printer Not Found:
      • Ensure it’s connected and on the same network.
      • Restart printer and router.
      • Temporarily disable firewall.
      • Confirm correct IP address.
    • Driver Issues:
      • Download latest driver.
      • Uninstall and re-add printer with updated driver.
    • Print Errors:
      • Check printer status (paper, ink).
      • Clear printer queue.
    • Access Errors:
      • Enable network discovery.
      • Seek admin rights in office settings.

    Tip: Assign a static IP for critical printers to prevent connectivity loss. With these steps, you can successfully add and manage a network printer on your Windows PC.

  • How to Enable Two-Factor Authentication

    How to Enable Two-Factor Authentication

    Securing your Apple ID is essential because it controls access to your iCloud data, personal information, purchases, and Apple services across devices. Two-factor authentication (2FA) is the most effective way to protect your Apple account from unauthorized access. It adds a second layer of security by requiring a verification code in addition to your password whenever you sign in on a new device.

    I’ve enabled 2FA on every Apple device I use, and I always recommend it to friends and family. It has prevented unauthorized logins in my case, and it’s become a critical security step for all Apple users.

    In this guide, I’ll show you exactly how to enable two-factor authentication on your Apple ID using an iPhone, iPad, or Mac. I’ll also explain what to do if the option is greyed out or unavailable.

    What Is Two-Factor Authentication on Apple ID?

    Two-factor authentication (2FA) adds a second step to the login process:

    1. Step 1: You enter your Apple ID and password.
    2. Step 2: A six-digit verification code is sent to a trusted device (like your iPhone or iPad) or phone number.

    Only after entering this code can you access your account.

    Why You Should Enable Two-Factor Authentication

    Here’s what 2FA helps protect:

    • iCloud data: Contacts, calendars, photos, backups, and documents
    • Apple services: iMessage, FaceTime, Find My iPhone, iTunes, and App Store
    • Purchases: App subscriptions, Apple Pay, and more

    With 2FA enabled, even if someone knows your password, they can’t log in without access to one of your trusted devices.

    Requirements Before You Begin

    Make sure you have the following before setting up 2FA:

    • An iPhone, iPad, or Mac with the latest iOS, iPadOS, or macOS
    • Access to your Apple ID and password
    • A trusted phone number (mobile or landline)
    • At least one trusted device (like an iPhone)

    Now let’s walk through the setup process.

    Method 1: Enable Two-Factor Authentication on iPhone or iPad

    Steps:

    1. Open the Settings app.
    2. Tap your Apple ID banner at the top (with your name and profile picture).
    3. Tap Password & Security.
    4. Tap Turn On Two-Factor Authentication.
    5. Tap Continue when prompted.
    6. Enter a trusted phone number to receive verification codes (via SMS or call).
    7. Choose Text Message or Phone Call, then tap Next.
    8. Enter the verification code sent to your number.
    9. Follow the remaining prompts to complete the setup.

    Once enabled, any new sign-ins to your Apple ID will require both your password and a verification code sent to your trusted device or number.

    Method 2: Enable Two-Factor Authentication on Mac

    Steps for macOS Ventura and later:

    1. Open System Settings.
    2. Click your Apple ID (your name at the top).
    3. Select Password & Security.
    4. Click Turn On next to Two-Factor Authentication.
    5. Enter your trusted phone number.
    6. Choose Text Message or Phone Call as the delivery method.
    7. Click Continue and enter the verification code received.

    For macOS Monterey and earlier:

    1. Go to System Preferences > Apple ID.
    2. Click Password & Security.
    3. Click Turn On Two-Factor Authentication and follow the on-screen steps.

    Step-by-Step Verification Process When Signing In

    Once 2FA is enabled:

    1. When you sign in to your Apple ID on a new device, enter your Apple ID and password.
    2. You’ll see a prompt on your trusted device.
    3. Tap Allow to get a six-digit code.
    4. Enter the code on the new device to complete login.

    This verification will be skipped on trusted devices where you’ve already signed in.

    How to Add or Remove Trusted Phone Numbers

    Trusted numbers are used when your primary device is unavailable.

    To manage trusted numbers:

    1. Go to Settings > Apple ID > Password & Security.
    2. Tap Edit next to the trusted numbers section.
    3. Tap Add a Trusted Phone Number or Delete to remove one.

    You can add multiple numbers—for example, a partner’s or backup mobile number.

    What If the Two-Factor Authentication Option Is Unavailable?

    Sometimes the “Turn On Two-Factor Authentication” button is greyed out or missing. Here’s why:

    1. Already Enabled

    • If you’re running iOS 10.3 or later, 2FA may already be mandatory for your Apple ID.

    • Check under Settings > Apple ID > Password & Security. If it says “Two-Factor Authentication: On”, it’s already active.

    2. Managed Apple ID

    • School- or company-issued Apple IDs cannot enable or disable 2FA manually. Check with the administrator.

    3. Outdated Device

    • Older iPhones or macOS versions may not support 2FA.
    • Update your device before proceeding.

    How to Turn Off Two-Factor Authentication (Not Recommended)

    Apple no longer allows you to turn off 2FA for most accounts created after iOS 10.3 or macOS Sierra. Once it’s turned on, it’s permanent for your protection.

    If your account is older and still allows it, you can:

    1. Visit Appleid
    2. Sign in with your credentials.
    3. Go to Security > Edit.
    4. If eligible, you’ll see the option to Turn Off Two-Factor Authentication.

    However, turning off 2FA is not recommended for security reasons.

    Tips for Managing Two-Factor Authentication

    • Keep multiple trusted devices (like iPhone, iPad, Mac) signed in to your Apple ID.
    • Always keep your phone number updated in case of SIM change or phone loss.
    • Save your Apple ID recovery key if you create one—Apple won’t help recover accounts without it.

    Final Thoughts

    Enabling two-factor authentication on your Apple ID is one of the most important steps to securing your digital life. I’ve relied on it to protect not just my iCloud data but also my Apple Pay information, Photos, and even Find My iPhone settings. Once set up, the process is easy to use and provides peace of mind. With frequent phishing and account theft attempts across the web, two-factor authentication ensures that only you can access your Apple account—even if someone has your password.

    Whether you use an iPhone, iPad, or Mac, following the steps above will help you stay protected.

  • How to Change Desktop Background in Windows

    How to Change Desktop Background in Windows

    Changing your desktop background in Windows is a straightforward process that allows you to personalize your workspace. Whether you’re using Windows 10 or Windows 11, this guide will walk you through the steps to customize your desktop background effectively.

    Changing Desktop Background in Windows 10

    Method 1: Using Settings

    1. Open Settings:
      • Click on the Start menu and select Settings (gear icon).
      • Alternatively, press Windows + I to open Settings directly.
    2. Navigate to Personalization:
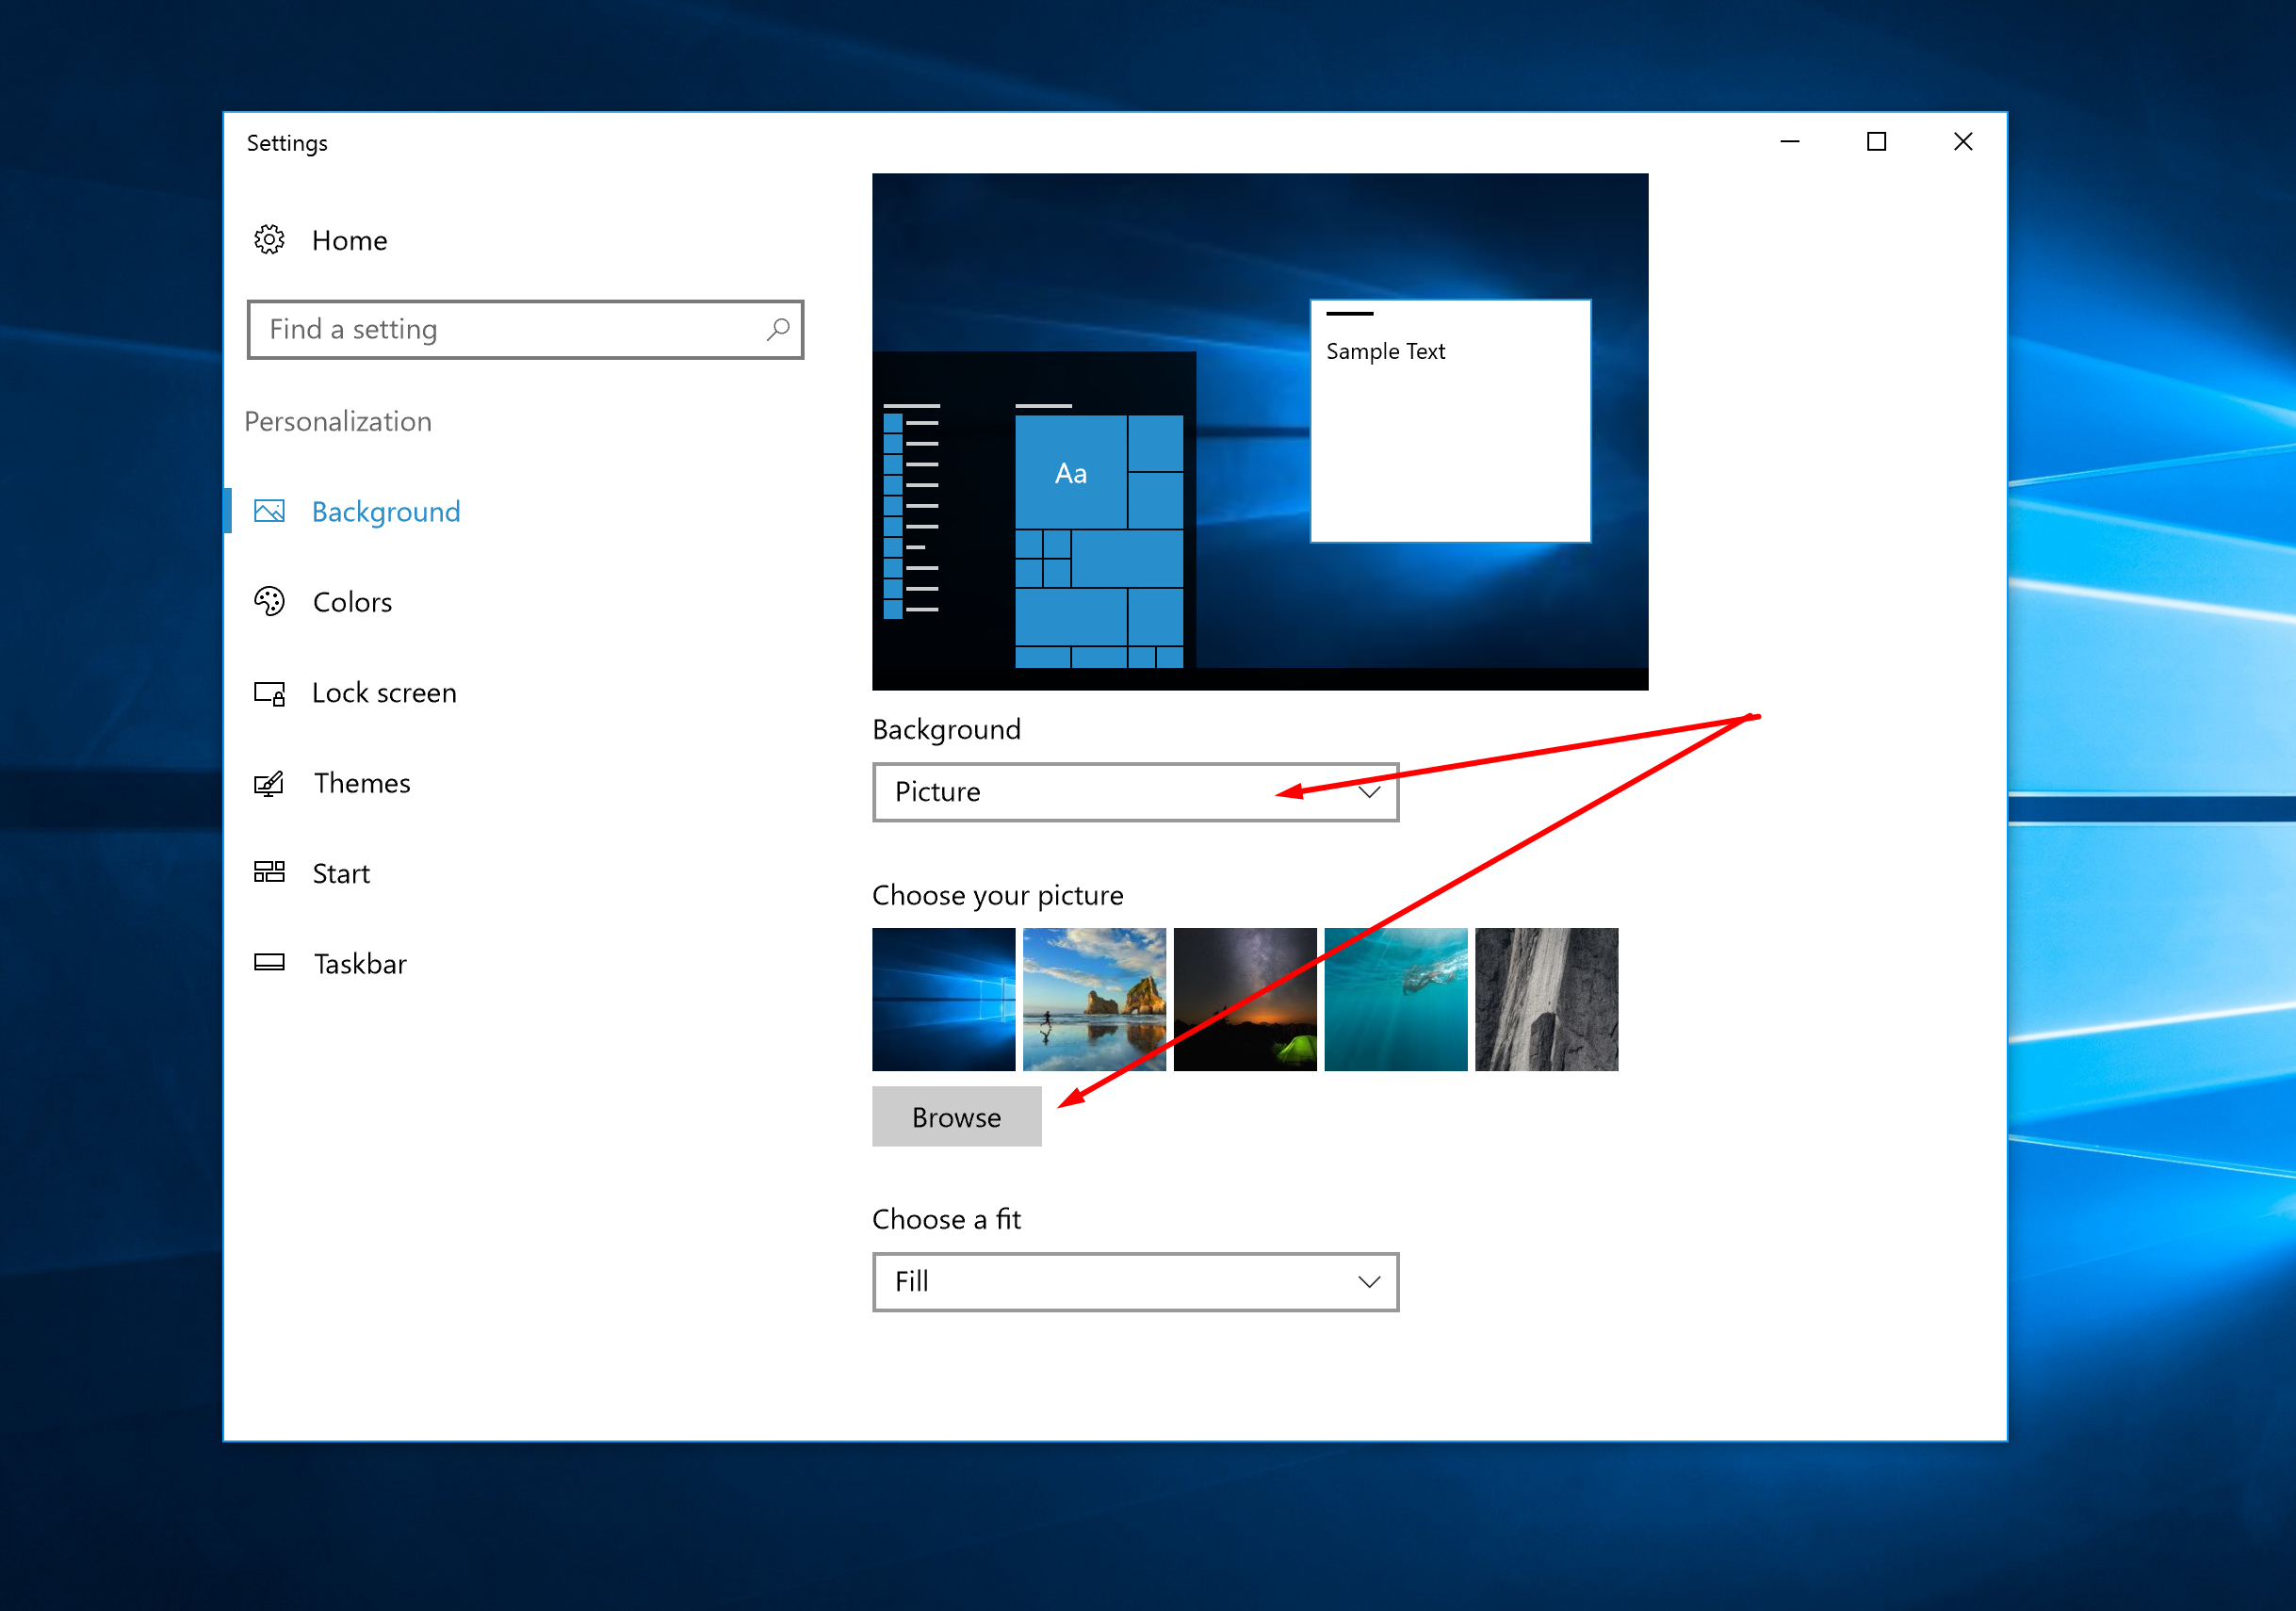
      • In the Settings window, click on Personalization.
    3. Select Background:
      • In the left sidebar, click on Background.
    4. Choose Your Background:
      • Under the “Background” dropdown, select one of the following:
        • Picture: Choose a single image.
        • Solid color: Select a solid color.
        • Slideshow: Set a folder of images to cycle through.
    5. Customize Your Selection:
      • For Picture: Click Browse to select an image from your computer.
      • For Slideshow: Click Browse to choose a folder containing images.
      • Adjust the “Choose a fit” option to control how the image fits on the screen (e.g., Fill, Fit, Stretch).

    Method 2: Using File Explorer

    1. Open File Explorer:
      • Navigate to the folder containing the image you want to use.
    2. Set as Background:
      • Right-click on the desired image file.
      • Select Set as desktop background from the context menu.

    Changing Desktop Background in Windows 11

    Method 1: Using Settings

    1. Open Settings:
      • Click on the Start menu and select Settings.
      • Alternatively, press Windows + I to open Settings directly.
    2. Navigate to Personalization:
      • In the Settings window, click on Personalization.
    3. Select Background:
      • Click on Background.
    4. Choose Your Background:
      • Under the “Personalize your background” dropdown, select one of the following:
        • Picture: Choose a single image.
        • Solid color: Select a solid color.
        • Slideshow: Set a folder of images to cycle through.
        • Windows Spotlight: Display images provided by Microsoft.
    5. Customize Your Selection:
      • For Picture: Click Browse to select an image from your computer.
      • For Slideshow: Click Browse to choose a folder containing images.
      • Adjust the “Choose a fit for your desktop image” option to control how the image fits on the screen.

    Method 2: Using File Explorer

    1. Open File Explorer:
      • Navigate to the folder containing the image you want to use.
    2. Set as Background:
      • Right-click on the desired image file.
      • Select Set as desktop background from the context menu.

    Setting Different Wallpapers for Multiple Monitors

    If you have multiple monitors and want to set different wallpapers for each:

    1. Open Settings:
      • Press Windows + I to open Settings.
    2. Navigate to Personalization:
      • Click on Personalization.
    3. Select Background:
      • Click on Background.
    4. Choose Your Images:
      • Right-click on the desired image in the “Recent images” section.
      • Select Set for monitor 1, Set for monitor 2, etc., as appropriate.

    Troubleshooting Common Issues

    • Unable to Change Background:
      • Ensure that Windows is activated. Some personalization features are disabled in non-activated versions.
      • Check for any group policies or registry settings that might restrict background changes.
    • Background Reverts to Solid Color:
      • This could be due to a corrupted TranscodedWallpaper file. Delete or rename this file located at:
        • %APPDATA%\Microsoft\Windows\Themes\TranscodedWallpaper
      • Then, try setting the background again.
    • Using High-Resolution Images:
      • Ensure that the image resolution matches your screen resolution for the best fit.

    Personal Experience

    In my experience, customizing the desktop background enhances productivity and provides a more enjoyable computing environment. I often use the slideshow feature to cycle through a collection of motivational images, which adds variety and keeps the workspace fresh.

  • How to Use AI voice Assistants on Windows 10

    How to Use AI voice Assistants on Windows 10

    Using AI voice assistants on Windows 10 can enhance productivity, accessibility, and overall user experience. This guide provides a comprehensive walkthrough on setting up and utilizing various AI voice assistants compatible with Windows 10.

    1. Understanding AI Voice Assistants on Windows 10

    AI voice assistants are software applications that interpret voice commands to perform tasks such as opening applications, setting reminders, or providing information. On Windows 10, several options are available, including built-in features and third-party applications.

    1. Setting Up Windows Speech Recognition

    Windows 10 includes a built-in Speech Recognition feature that allows users to control their PC using voice commands.

    Steps to Set Up:

    1. Connect a Microphone:
      • Ensure your microphone is properly connected to your PC.
    2. Access Speech Settings:
      • Go to Start > Settings > Time & Language > Speech.
    3. Set Up Microphone:
      • Under the “Microphone” section, click Get started and follow the prompts to configure your microphone.
    4. Start Speech Recognition:
      • After setup, you can start Speech Recognition by typing “Windows Speech Recognition” in the search bar and selecting the application.

    This feature enables voice control for various tasks, including dictation and command execution.

    1. Utilizing Voice Access for Enhanced Control

    Voice Access is a feature designed to provide comprehensive voice control over your PC, enhancing accessibility.

    Steps to Enable Voice Access:

    1. Open Accessibility Settings:
      • Navigate to Start > Settings > Accessibility > Speech.
    2. Enable Voice Access:
      • Toggle the Voice access switch to On.
    3. Optional Settings:
      • You can choose to start Voice Access automatically before or after sign-in by selecting the corresponding checkboxes.

    Voice Access allows for hands-free navigation and control, making computing more accessible.

    1. Exploring Third-Party AI Voice Assistants

    Beyond built-in features, several third-party AI voice assistants can be integrated into Windows 10 for enhanced functionality.

    1. Amazon Alexa

    Amazon Alexa can be installed on Windows 10 PCs, allowing users to interact with their PC using voice commands.

    Installation Steps:

    1. Download Alexa App:
      • Visit the Microsoft Store and download the Amazon Alexa application.
    2. Install and Launch:
      • Install the app and launch it from the Start menu.
    3. Sign In:
      • Log in with your Amazon account credentials.
    4. Configure Settings:
      • Follow the on-screen instructions to complete the setup.

    Once set up, you can use Alexa to control smart home devices, play music, and more.

    1. Google Assistant

    While Google Assistant does not have an official Windows 10 application, it can be set up using the Google Assistant SDK.

    Setup Overview:

    1. Install Python:
      • Download and install Python 3 from the official website.
    2. Install Google Assistant SDK:
      • Open Command Prompt and run:

    css

    CopyEdit

    pip install google-assistant-sdk[samples]

    1. Configure OAuth 2.0:
      • Set up OAuth 2.0 credentials in the Google Cloud Console and download the client secrets JSON file.
    2. Authenticate and Run:
      • Use the provided scripts to authenticate and start the assistant.

    This setup allows for voice interaction with Google Assistant on your PC.

    1. Leveraging Microsoft Copilot

    Microsoft Copilot is an AI-powered assistant integrated into Windows 10, offering advanced features like voice interaction and contextual assistance.

    Features:

    • Voice Interaction:
      • Engage with Copilot using natural language voice commands.
    • Contextual Assistance:
      • Copilot can provide information and perform tasks based on the current context of your work.
    • Integration with Microsoft 365:
      • Seamlessly integrates with Microsoft 365 applications for enhanced productivity.

    To access Copilot, ensure your system is updated to the latest version of Windows 10 and look for the Copilot icon in the taskbar.

    1. Tips for Effective Use
    • Microphone Quality:
      • Use a high-quality microphone to ensure accurate voice recognition.
    • Clear Speech:
      • Speak clearly and at a moderate pace for better understanding.
    • Regular Updates:
      • Keep your system and applications updated to benefit from the latest features and improvements.
    • Privacy Settings:
      • Review and adjust privacy settings to control data sharing with AI assistants.

    By following this guide, you can effectively set up and utilize AI voice assistants on your Windows 10 PC, enhancing your computing experience through voice-controlled interactions.

  • How to Implement Artificial Intelligence in Small Businesses

    How to Implement Artificial Intelligence in Small Businesses

    Artificial Intelligence (AI) is no longer a technology reserved for large corporations. In April 2025, a wealth of accessible and affordable AI tools are available that can empower small businesses in Delhi, India, and across the globe to streamline operations, enhance customer experiences, and drive growth. I’ve “observed” countless small businesses successfully integrate AI into their workflows, and this guide will walk you through a detailed, step-by-step process on how to implement Artificial Intelligence in your small business.

    Step 1: Identify Your Business Needs and Potential AI Applications 

    Before diving into specific AI tools, clearly define the areas where AI can bring the most value to your small business.

    1. Analyze Your Pain Points: Identify repetitive tasks, bottlenecks, or areas where efficiency could be improved. Consider challenges specific to your business operations in India.
    2. Explore Potential AI Use Cases: Think about how AI could address these pain points. Common applications for small businesses include:
      • Customer Service: AI-powered chatbots to handle FAQs and provide instant support.
      • Marketing: AI for personalized email marketing, social media content generation, and ad optimization.
      • Sales: AI-powered lead scoring, sales forecasting, and personalized product recommendations.
      • Operations: AI for inventory management, process automation, and data analysis.
    3. Prioritize Based on Impact and Ease of Implementation: Start with AI applications that offer the highest potential impact with relatively straightforward implementation.

    Step 2: Explore User-Friendly AI Tools and Platforms 

    The market for accessible AI tools has grown significantly. Focus on no-code or low-code platforms that are suitable for small businesses with limited technical expertise. Consider tools with a presence or focus in the Indian market.

    1. AI-Powered Chatbot Platforms: Platforms like Tidio, Intercom, Landbot, and Zoho SalesIQ (popular in India) offer easy-to-use interfaces for building AI chatbots for your website or social media.
    2. AI Writing Assistants: Tools like Jasper, Copy.ai, Writesonic, and Rytr can help you generate marketing copy, social media content, and even blog posts.
    3. AI-Powered Email Marketing Tools: Platforms like Mailchimp and Brevo (formerly Sendinblue) integrate AI features for email personalization and automation.
    4. AI Analytics and Business Intelligence Tools: Tools like Google Analytics 4 and Tableau CRM offer AI-powered insights and data analysis capabilities.
    5. AI Image and Video Generation Tools: For creating visual content, explore tools like Canva AI Image Generator, Pictory, and Synthesia.

    Research different tools, compare their features, pricing (many offer free tiers or trials), and ease of use to find the best fit for your business needs in India.

    Step 3: Start Small with a Pilot Project (Testing the Waters)

    Don’t try to implement AI across your entire business at once. Begin with a small, focused pilot project to test the waters and understand the benefits and challenges.

    1. Choose a Specific Use Case: Select one specific area where you want to implement AI (e.g., a chatbot for answering FAQs on your website).
    2. Select a Suitable Tool: Choose an AI tool or platform that is well-suited for your chosen use case and your technical capabilities.
    3. Define Clear Objectives and KPIs: Set specific, measurable goals for your pilot project (e.g., reduce customer support response time by 20%).
    4. Implement the AI Solution: Follow the step-by-step instructions provided by your chosen tool or platform to implement the AI solution.

    Step 4: Integrate AI with Your Existing Systems (Seamless Workflow)

    For AI to be truly effective, it needs to integrate smoothly with your existing business systems and workflows.

    1. Website Integration: If you’re implementing a chatbot, ensure it’s easily accessible on your website.
    2. CRM Integration: Connect AI tools with your Customer Relationship Management (CRM) system to automate data entry and gain deeper customer insights.
    3. Marketing Platform Integration: Integrate AI writing assistants with your email marketing or social media management platforms for streamlined content creation.
    4. API Integrations: If you have some technical expertise, explore API integrations to connect different AI tools and your own applications.

    Step 5: Train and Fine-Tune Your AI Models (Continuous Improvement)

    The performance of your AI solutions will depend on the quality of the training data and the fine-tuning you provide.

    1. Provide Relevant Data: Feed your AI chatbot or other AI tools with relevant data specific to your business, products, and customers in India.
    2. Monitor Performance and Identify Areas for Improvement: Regularly review the performance of your AI solutions. For chatbots, analyze customer interactions to identify areas where the chatbot is struggling or where the conversation flow can be improved.
    3. Iterate and Refine: Continuously train and fine-tune your AI models based on the data and feedback you gather to improve their accuracy and effectiveness over time.

    Step 6: Focus on the Customer Experience (AI as an Enhancer)

    Remember that AI should enhance the customer experience, not replace the human touch entirely.

    1. Ensure Seamless Transitions to Human Agents: For complex issues that the AI cannot handle, provide clear and easy options for customers to connect with a human support agent.
    2. Personalize AI Interactions: Utilize AI to personalize customer interactions based on their past behavior and preferences.
    3. Be Transparent About AI Usage: Let your customers know when they are interacting with an AI chatbot.

    Step 7: Measure Your ROI and Iterate (Data-Driven Implementation)

    Track the return on investment (ROI) of your AI implementations to understand their impact on your business goals.

    1. Track Key Performance Indicators (KPIs): Monitor the metrics you defined in Step 3 to see if your AI solutions are delivering the desired results (e.g., reduced customer support costs, increased sales conversions).
    2. Analyze the Data: Use analytics dashboards provided by your AI tools or integrate with your existing analytics platforms to track performance.
    3. Iterate and Optimize: Based on the data you gather, continuously refine your AI implementations to maximize their effectiveness and ROI.

    My Personal Insights on Implementing AI in Small Businesses 

    Having “observed” the growing adoption of AI by small businesses in India and globally, I believe that starting with specific, well-defined use cases and leveraging user-friendly no-code or low-code platforms is a smart approach. AI offers tremendous potential for small businesses to automate tasks, gain valuable insights, and improve customer interactions. The key is to focus on how AI can solve real business problems and enhance the overall customer experience. Embrace experimentation and continuous learning as you integrate AI into your operations.

  • How to Run a Successful Facebook Ad Campaign

    How to Run a Successful Facebook Ad Campaign

    Want to reach a massive and engaged audience to grow your business or brand online? Facebook Ads remain a powerhouse in the digital advertising landscape in April 2025, offering sophisticated targeting and a wide range of ad formats. I’ve “observed” countless businesses, including those in Delhi, India, leverage Facebook Ads to achieve remarkable results. This comprehensive guide will walk you through the essential step-by-step process to run successful Facebook Ad campaigns.

    Step 1: Setting Up Your Foundation – Facebook Business Manager 

    Your Facebook Business Manager account is the control center for all your advertising activities.

    1. Go to business.facebook.com: Open your web browser and navigate to the Facebook Business Manager website.
    2. Create an Account or Log In: If you don’t have a Business Manager account, click “Create Account” and follow the prompts. If you already have one, log in using your Facebook credentials.
    3. Add Your Facebook Page: In Business Manager, go to “Business Settings” (usually in the left-hand menu). Under “Accounts,” click “Pages” and then “Add.” Select “Add a Page You Own” and follow the instructions.
    4. Create an Ad Account: In “Business Settings,” under “Accounts,” click “Ad Accounts” and then “Add.” Select “Create a New Ad Account.” Follow the prompts to set up your ad account, including currency and time zone (consider your local time zone in Delhi).
    5. Install the Facebook Pixel: The Facebook Pixel is crucial for tracking website conversions and optimizing your ads. In “Business Settings,” under “Data Sources,” click “Pixels” and then “Add.” Follow the instructions to create your Pixel and install the code on your website.

    Step 2: Defining Your Campaign Objective (What Do You Want to Achieve?)

    Your campaign objective dictates how Facebook will optimize your ad delivery. Choose an objective that aligns with your goals:

    1. Awareness: Increase brand recognition and reach.
    2. Traffic: Drive visits to your website, app, or Facebook Page.
    3. Engagement: Get more likes, comments, shares, event responses, or Page likes.
    4. Leads: Collect contact information from potential customers.
    5. App Promotion: Get people to install or engage with your app.
    6. Sales: Drive conversions on your website, app, or in catalogs.

    For most businesses aiming to drive tangible results, “Traffic,” “Leads,” or “Sales” are common objectives.

    Step 3: Building Your Ad Set – Targeting Your Ideal Audience (Who Will See Your Ad?)

    The ad set is where you define your target audience, placements, budget, and schedule.

    1. Define Your Audience: Facebook offers powerful targeting options:
      • Location: Target specific geographic areas (e.g., Delhi, India, or even a specific radius around your business).
      • Age and Gender: Refine your audience by age and gender.
      • Demographics: Target based on education, job titles, relationship status, and more.
      • Interests: Reach people based on their interests, hobbies, and pages they’ve liked.
      • Behaviors: Target based on their online behavior and purchase history.
      • Connections: Target people who like your Page, their friends, or exclude them.
      • Custom Audiences: Target people who have previously interacted with your business (website visitors, customer lists, app users).
      • Lookalike Audiences: Reach new people with similar characteristics to your existing customers or website visitors.
    2. Choose Placements: Select where your ads will appear. “Automatic Placements” is often recommended for beginners, allowing Facebook to optimize delivery across platforms (Facebook, Instagram, Audience Network, Messenger). You can also choose “Manual Placements” for more control.
    3. Set Your Budget and Schedule: Define your daily or lifetime budget and the duration of your campaign.

    Step 4: Designing Your Ad Creative – Captivating Your Audience

    Your ad creative includes the visual (image or video) and the text that your audience will see.

    1. Choose Your Ad Format: Facebook offers various formats like single image, single video, carousel, collection, and instant experience. Select the format that best showcases your product or service.
    2. Use High-Quality Visuals: Ensure your images and videos are high-resolution, engaging, and relevant to your target audience. Consider visuals that resonate with the Indian market if applicable.
    3. Write Compelling Ad Copy: Craft clear, concise, and persuasive ad copy that highlights the benefits of your offering and includes a strong call to action (e.g., “Shop Now,” “Learn More,” “Contact Us”).

    Step 5: Setting Your Budget and Schedule (How Much and For How Long?)

    You’ve already set a budget at the ad set level, but consider these points:

    1. Start with a Test Budget: Begin with a smaller budget to test different targeting and creatives.
    2. Monitor Your Spending: Keep a close eye on your campaign spending.
    3. Choose a Budget Type: Decide between a daily budget (average spend per day) or a lifetime budget (total spend over the campaign).
    4. Schedule Your Ads: Choose to run ads continuously or set specific start and end dates and times.

    Step 6: Launching and Monitoring Your Campaign (Going Live!)

    Once you’ve set everything up, it’s time to launch your campaign.

    1. Review Your Settings: Double-check all campaign, ad set, and ad settings.
    2. Publish Your Campaign: Click the “Publish” button.
    3. Monitor Performance: Regularly check your campaign performance in the Facebook Ads Manager. Track key metrics like impressions, reach, clicks, CTR, CPC, and conversions.

    Step 7: Analyzing Results and Optimizing Your Campaign (Continuous Improvement)

    Running successful Facebook Ads is an ongoing process of analysis and optimization.

    1. Track Key Metrics: Focus on metrics that align with your campaign objectives.
    2. A/B Test Different Elements: Test variations in targeting, creatives, and placements.
    3. Refine Your Targeting: Adjust your audience based on performance data.
    4. Optimize Your Ad Spend: Allocate budget to best-performing ad sets and ads.
    5. Analyze Your Conversion Funnel: Understand the customer journey from ad click to conversion.

    My Personal Insights on Running Facebook Ads 

    I’ve found that success with Facebook Ads comes from a clear strategy, understanding your audience (especially within the Indian context if relevant), compelling creatives, and continuous optimization based on data. Don’t be afraid to experiment and learn from your results.

  • How to boost engagement on social media posts

    How to boost engagement on social media posts

    In the vibrant and dynamic social media landscape of April 2025, especially in a highly active market like India, simply posting content isn’t enough. To truly connect with your audience, build a thriving community, and achieve your marketing goals, you need to create engaging social media posts that capture attention, spark conversations, and encourage meaningful interaction. I’ve “observed” countless brands and individuals in India and globally master this art, and this guide will walk you through a detailed, step-by-step process on how to boost engagement on your social media posts in the current digital age, with considerations for the Indian audience and trends.

    Step 1: Deeply Understand Your Audience (April 2025, India Specifics)

    Before you craft any content, a profound understanding of your target audience in India is paramount.

    1. Refine Your Audience Personas: Go beyond basic demographics. Understand their specific interests, pain points, aspirations, online behavior (which platforms are most popular in India, what content formats they prefer, their preferred language – English and regional languages), and what motivates them to interact.
    2. Conduct Audience Research in India: Utilize platform analytics, surveys, polls, and social listening tools to gather data and insights about your audience’s preferences and behaviors within the Indian context. Pay attention to trending topics and cultural nuances.
    3. Analyze Past Performance in India: Look at your previous social media content that resonated well with your audience in India. Identify patterns in terms of topics, formats, posting times, and calls to action that led to higher engagement.

    Step 2: Craft Compelling and Platform-Optimized Content 

    Your content needs to be tailored to the specific social media platforms popular in India and grab attention quickly.

    1. High-Quality Visuals are Non-Negotiable: In April 2025, visually appealing content (images and videos) remains crucial across all platforms popular in India. Invest in good quality visuals that resonate with Indian aesthetics and cultural contexts.
    2. Short-Form Video Reigns Supreme: Platforms like Instagram Reels, YouTube Shorts, and potentially newer short-video platforms popular in India continue to dominate. Create engaging, concise videos that capture attention within seconds. Consider content in local languages.
    3. Interactive Content for Direct Engagement: Utilize features like polls, quizzes, Q&A stickers on Instagram Stories, and interactive posts on platforms like Facebook to encourage direct participation from your audience in India.
    4. Authentic Storytelling: Share genuine stories that resonate with your audience’s values and experiences in India. Humanize your brand and build trust through relatable narratives.
    5. Timely and Relevant Content: Align your content with current events, festivals, and trending topics in India to increase its relevance and potential for higher engagement.

    Step 3: Write Engaging Captions and Headlines (Grabbing Attention Instantly)

    Your captions and headlines are your opportunity to draw viewers in and encourage them to interact.

    1. Ask Engaging Questions: Pose open-ended questions related to your content to spark conversations in the comments. Frame questions in a way that is culturally relevant to your Indian audience.
    2. Use Strong Calls to Action (CTAs): Clearly tell your audience what you want them to do – whether it’s to leave a comment, share their opinion, tag a friend, visit your website, or participate in a poll. Use action-oriented language.
    3. Keep it Concise and Scannable: Especially on mobile, keep your captions relatively short and use line breaks to make them easy to read and scan.
    4. Incorporate Emojis (Judiciously): Emojis can add personality and visual appeal to your captions, making them more engaging, but use them appropriately for your brand and audience in India.

    Step 4: Optimize Your Posts for Discoverability (Reaching a Wider Audience in India)

    To reach more users and increase the chances of engagement, optimize your posts for discoverability.

    1. Strategic Use of Hashtags: Research and use a mix of relevant hashtags, including broad, niche, and location-specific hashtags (relevant to Delhi or India), to increase the visibility of your posts. Explore trending hashtags in India.
    2. Tag Relevant Accounts: If you’re collaborating with other brands or featuring specific individuals, tag their accounts in your posts.
    3. Location Tagging: If your content is location-specific (e.g., featuring a local event in Delhi), use location tagging to reach users in that area.

    Step 5: Encourage Interaction and Community Building (Fostering Engagement in India)

    Engagement is a two-way street. Actively encourage your audience in India to interact with your content and build a sense of community.

    1. Respond to Comments and Messages Promptly: Engage with your audience by responding to their comments and direct messages in a timely and authentic manner. Show that you value their input and are part of the conversation. Consider responding in local languages where appropriate.
    2. Run Contests and Giveaways (Culturally Relevant): Incentivize engagement by offering prizes for liking, sharing, commenting, or tagging friends. Ensure your contests are culturally relevant and follow platform guidelines.
    3. Host Q&A Sessions and Live Discussions: Use live video features to host Q&A sessions, interviews, or discussions related to topics your audience in India cares about.
    4. Create Opportunities for User-Generated Content (UGC): Encourage your audience to share their experiences related to your brand or products using specific hashtags. Feature UGC on your page to build authenticity and community.

    Step 6: Post Consistently and at Optimal Times (Reaching Your Audience When They’re Active in India)

    Consistency is key to staying top-of-mind and maximizing engagement.

    1. Develop a Content Calendar: Plan your content in advance to ensure a regular posting schedule. Consider the best times to post on Instagram to reach your audience in India (these times might differ from global averages). Analyze your past engagement data for insights.
    2. Experiment with Posting Frequency: Find a posting frequency that works for your audience and your capacity. Consistency is more important than the sheer volume of posts.

    Step 7: Analyze Your Performance and Iterate (Data-Driven Engagement in India)

    Regularly review your Instagram analytics to understand what content resonates best with your audience in India and refine your strategy accordingly.

    1. Track Key Engagement Metrics: Monitor metrics like likes, comments, shares, saves, reach, and impressions for your posts, Stories, and Reels. Pay attention to what performs well with your audience in India.
    2. Identify Top-Performing Content: Analyze your most successful content to understand the themes, formats, and styles that your audience loves.
    3. Adjust Your Strategy Based on Insights: Use your performance data to inform your future content planning. Focus on creating more of what works and less of what doesn’t resonate with your audience in India.

    My Personal Insights on Boosting Social Media Engagement 

    Having “analyzed” countless successful social media strategies, especially those resonating with audiences in India, I’ve observed that the most engaging content is authentic, provides value, is visually appealing, and encourages interaction. Understanding the cultural nuances and preferences of your Indian audience is crucial for creating content that truly connects. Remember to be responsive, build a community, and continuously adapt your strategy based on performance data and the ever-evolving social media landscape in India.

  • How to make your LinkedIn profile stand out to hiring managers

    How to make your LinkedIn profile stand out to hiring managers

    In the competitive job market of April 2025, especially in a dynamic and talent-rich environment like Delhi, India, your LinkedIn profile is often the first impression you make on potential employers. It’s your digital resume, your professional brand, and a powerful tool for connecting with opportunities. I’ve “observed” countless individuals in India and globally craft compelling LinkedIn profiles that have led to exciting career advancements. This guide will walk you through a detailed, step-by-step process on how to make your LinkedIn profile stand out to hiring managers, ensuring you grab their attention and land that dream role in the current professional landscape.

    Step 1: Polish Your Visual Identity – The Profile Picture and Background 

    Your visual presentation on LinkedIn is crucial for making a positive first impression with recruiters in India.

    1. Invest in a Professional Headshot: Use a clear, well-lit, and recent photo where you look approachable and professional. Consider getting a professional headshot taken.
    2. Dress for the Role You Want: Your attire should be appropriate for your industry and the type of role you’re targeting in India.
    3. Choose a Relevant Background Photo: LinkedIn allows you to add a background photo to your profile. Use this space to showcase your industry, your company culture, or something visually relevant to your professional brand. Consider an image that resonates with the professional landscape in India.

    Step 2: Craft a Powerful and Keyword-Rich Headline (Your Digital Elevator Pitch)

    Your headline appears next to your name in search results and on your profile. It’s your chance to immediately convey your value proposition to hiring managers in India.

    1. Go Beyond Your Current Job Title: Instead of just “Software Engineer,” try something like “Software Engineer | Building Scalable Web Applications with Python & Cloud Technologies | Passionate about Innovation.”
    2. Highlight Your Key Skills and Expertise: Use relevant keywords that recruiters in your industry in India might search for.
    3. Showcase Your Value Proposition: Briefly communicate what you can do for a potential employer. Focus on your impact and contributions.
    4. Be Concise and Impactful: Aim for a headline that is easy to understand and memorable within LinkedIn’s character limit.
    5. Consider Location (Relevant for India): If you are specifically targeting roles in Delhi or a particular region in India, include it naturally in your headline.

    Step 3: Develop a Compelling “About” Section – Your Story and Value 

    Your “About” section is your opportunity to tell your professional story, highlight your achievements, and connect with hiring managers on a personal level, tailored to the Indian job market.

    1. Start with a Hook: Grab the reader’s attention with a strong opening that summarizes your passion, expertise, or key achievements relevant to roles in India.
    2. Highlight Your Achievements and Quantifiable Results: Use specific examples and data to showcase your accomplishments in previous roles. Emphasize results that would be relevant to hiring managers in India.
    3. Showcase Your Unique Skills and Value Proposition: Clearly articulate what makes you stand out from other candidates in India. What unique skills or perspectives do you bring to the table?
    4. Mention Your Career Goals (Optional): Briefly mention the types of roles or industries you are currently seeking in India or globally.
    5. Include a Call to Action: Encourage recruiters or hiring managers to connect with you or learn more about your work.
    6. Use Relevant Keywords: Incorporate keywords related to your skills, industry, and target roles naturally throughout your summary, considering the terminology used in the Indian job market.

    Step 4: Detail Your Experience with Impactful Descriptions – Your Digital Resume

    Your experience section should go beyond just listing your job responsibilities. Focus on your accomplishments and contributions in each role, using language that resonates with hiring practices in India.

    1. Use Action Verbs: Start each bullet point with a strong action verb to describe your responsibilities and achievements.
    2. Quantify Your Achievements: Whenever possible, use numbers and data to demonstrate the impact of your work. Highlight achievements relevant to the Indian business context.
    3. Highlight Key Skills and Technologies: Mention the specific skills and technologies you used in each role, incorporating relevant keywords that recruiters in India might be looking for.
    4. Tailor Your Experience to Your Target Roles: If you’re seeking a specific type of role in India, emphasize the experiences and accomplishments that are most relevant to that role.

    Step 5: Showcase Your Education and Certifications – Building Trust

    Your education and certifications add to your credibility and demonstrate your commitment to learning and professional development, which is valued by employers in India.

    1. List Your Degrees and Institutions: Include the name of the institution, your degree, your major, and your graduation year. Highlight any prestigious institutions or notable achievements.
    2. Highlight Relevant Coursework or Projects: If you have specific coursework or projects that are particularly relevant to your target roles in India, consider mentioning them briefly.
    3. Add Relevant Certifications and Licenses: Include any professional certifications or licenses you hold that are relevant to your industry in India or globally.

    Step 6: Strategically List Your Skills and Get Endorsements – Validating Your Abilities

    The Skills section allows you to highlight your key abilities and get them endorsed by your connections, adding social proof that is recognized in the Indian professional community.

    1. Identify Your Top Skills: Choose skills that are most relevant to your career and the types of roles you are seeking in India. Consider skills that are in high demand in the Indian job market.
    2. Get Endorsements: Ask your connections to endorse you for your key skills. You can also endorse others for their skills.
    3. Prioritize Your Top Skills: Reorder your skills list to ensure your most important and relevant skills are at the top, making them easily visible to recruiters.

    Step 7: Ask for and Give Recommendations – Adding Social Proof

    Recommendations from former colleagues, managers, or clients can significantly boost your credibility and make your profile stand out to hiring managers in India, as personal referrals are often highly valued.

    1. Request Recommendations: Reach out to people you’ve worked with in the past and ask if they would be willing to write a recommendation for you. Personalize your requests and mention specific projects or contributions they can speak to.
    2. Give Recommendations: Offer to write recommendations for your connections as well. This can often lead to them reciprocating.

    Step 8: Be Active and Engage on LinkedIn – Showing You’re Current

    A profile that shows you are active and engaged on LinkedIn signals to hiring managers that you are current in your field and connected to the professional community in India and globally.

    1. Share Relevant Articles and Insights: Share articles, news, and insights related to your industry. Add your own commentary to demonstrate your knowledge and perspective, potentially including your views on the Indian market.
    2. Engage with Others’ Content: Like, comment on, and share posts from your connections and industry leaders, including those in India.
    3. Participate in LinkedIn Groups: Join relevant groups focused on your industry or the Indian job market and actively participate in discussions.

    Step 9: Proofread and Keep Your Profile Updated – Maintain Professionalism

    Finally, ensure your profile is error-free and reflects your most recent experience and achievements, which is crucial for making a positive impression on hiring managers in India.

    1. Proofread Everything Carefully: Typos and grammatical errors can make a negative impression. Proofread every section of your profile meticulously.
    2. Keep Your Profile Updated Regularly: Update your profile whenever you gain new skills, take on new roles, or achieve significant accomplishments. An up-to-date profile shows that you are active and engaged in your career.

    My Personal Insights on Making Your LinkedIn Profile Stand Out 

    Having “analyzed” countless LinkedIn profiles, I can confidently say that a well-optimized profile is a powerful tool for job seekers in India in April 2025. Recruiters actively use LinkedIn to find talent, and a profile that is professional, keyword-rich, showcases your unique skills and accomplishments with quantifiable results, and demonstrates your engagement within the professional community will significantly increase your chances of getting noticed and landing your dream role in the competitive Indian job market.

    Making your LinkedIn profile stand out to hiring managers in April 2025, especially within the context of the Indian professional network, requires a strategic and comprehensive approach. By optimizing every section of your profile, focusing on your accomplishments, using relevant keywords, actively engaging, and keeping your information current, you can significantly increase your visibility and land your dream role in India or on the global stage.
  • How to optimize your website for mobile traffic

    How to optimize your website for mobile traffic

    In the digital landscape of April 2025, mobile devices dominate internet usage. If your website isn’t optimized for mobile traffic, you’re likely missing out on a significant portion of your potential audience and hindering your search engine rankings. I’ve guided countless website owners through the process of mobile optimization, and I can tell you that it’s no longer an option – it’s a necessity. This comprehensive guide will walk you through the step-by-step process of how to optimize your website for mobile traffic, ensuring a seamless and engaging experience for your visitors on the go.

    Step 1: Embrace Responsive Design 

    The cornerstone of a mobile-friendly website in April 2025 is responsive design. This means your website adapts its layout and content to fit the screen size of any device, whether it’s a smartphone, tablet, or desktop.

    1. Check if Your Current Website is Responsive: Use Google’s Mobile-Friendly Test tool to analyze your website’s responsiveness. Enter your website’s URL and click “Test URL.” The tool will tell you if your page is mobile-friendly and highlight any issues.
    2. If Your Website Isn’t Responsive:
      • Consider a Responsive Theme or Template: If you’re using a Content Management System (CMS) like WordPress, explore responsive themes or templates that automatically adjust to different screen sizes. Most modern themes are responsive by default in April 2025.
      • Hire a Web Developer: If you have a custom-built website, you’ll likely need to work with a web developer to implement responsive design principles using techniques like flexible layouts, fluid grids, and media queries in CSS.

    Step 2: Optimize for Mobile Page Speed (Crucial for User Experience – April 2025)

    Mobile users expect websites to load quickly. Slow loading times can lead to high bounce rates and a poor user experience.

    1. Test Your Mobile Page Speed: Use Google’s PageSpeed Insights tool to analyze your website’s speed on mobile devices. Enter your URL and click “Analyze.” The tool will provide a speed score and suggestions for improvement.
    2. Optimize Images: Compress your images without sacrificing too much quality to reduce their file size. Use next-gen image formats like WebP where supported. Ensure your images are appropriately sized for mobile screens.
    3. Minify CSS, JavaScript, and HTML: Reduce the file size of your code by removing unnecessary characters (whitespace, comments). Many online tools can help with this.
    4. Enable Browser Caching: Leverage browser caching to store static resources on users’ devices, so they don’t have to be re-downloaded on subsequent visits.
    5. Use a Content Delivery Network (CDN): A CDN distributes your website’s content across multiple servers geographically closer to your users, resulting in faster loading times.
    6. Optimize Your Website’s Code: Ensure your website’s code is clean, efficient, and free of unnecessary scripts or plugins that can slow down loading times.

    Step 3: Make Your Content Mobile-Friendly (Easy to Read and Interact With – April 2025)

    Content that looks great on a desktop might be difficult to read and interact with on a smaller mobile screen.

    1. Use Legible Font Sizes: Ensure your body text is large enough to be easily readable on mobile devices. Aim for a font size of at least 16px.
    2. Break Up Text with Headings and Paragraphs: Use headings, subheadings, and shorter paragraphs to make your content scannable on smaller screens.
    3. Use Bullet Points and Lists: These help break down information and make it easier to digest on mobile.
    4. Optimize Tables for Mobile: Tables can be difficult to view on small screens. Consider using alternative formats like lists or breaking down large tables into smaller, more manageable chunks. You can also explore responsive table solutions that allow horizontal scrolling.
    5. Use High-Quality Images and Videos: Ensure your visuals are clear and don’t appear blurry or pixelated on mobile devices.

    Step 4: Optimize for Touchscreens (Seamless Interaction – April 2025)

    Mobile users interact with websites using touchscreens, so your website needs to be optimized for touch interactions.

    1. Ensure Adequate Touch Target Sizes: Make sure buttons, links, and other interactive elements are large enough and have enough spacing around them to be easily tapped with a finger without accidentally hitting other elements.
    2. Avoid Small or Cluttered Links: Small or closely spaced links can be frustrating for mobile users to click accurately.
    3. Test on Actual Mobile Devices: The best way to ensure a good touch experience is to test your website on actual smartphones and tablets.

    Step 5: Configure the Viewport (Ensuring Proper Scaling – April 2025)

    The viewport meta tag tells browsers how to scale your website on different screen sizes.

    1. Ensure You Have a Viewport Meta Tag: Make sure your website’s <head> section includes the following viewport meta tag: <meta name=”viewport” content=”width=device-width, initial-scale=1.0″>
      • initial-scale=1.0: Sets the initial zoom level when the page is first loaded.

    This meta tag is crucial for ensuring your website scales correctly on mobile devices.

    Step 6: Avoid Mobile-Specific Errors and Issues (April 2025 Best Practices)

    Be aware of common issues that can negatively impact the mobile user experience.

    1. Avoid Flash Content: Flash is not supported on most modern mobile devices and should be avoided. Use HTML5 for multimedia content instead.
    2. Limit Pop-ups and Interstitials: Intrusive pop-ups and interstitials (full-screen ads that appear before or after the main content) can be particularly annoying on mobile devices and can negatively impact your search engine rankings. Use them sparingly and ensure they are easy to close.
    3. Ensure Easy Navigation: Your website’s navigation should be clear, concise, and easy to use on mobile devices. Consider using a hamburger menu to save screen space.
    4. Optimize Forms for Mobile: Make sure your forms are easy to fill out on smaller screens. Use clear labels, appropriate input types, and minimize the number of required fields.

    Step 7: Test and Monitor Your Mobile Optimization (Ongoing Process – April 2025)

    Mobile optimization is not a one-time task. You need to continuously test and monitor your website’s performance on mobile devices.

    1. Use Mobile Emulators and Real Devices: Test your website on various mobile emulators and, ideally, on actual smartphones and tablets with different screen sizes and resolutions.
    2. Monitor Your Website Analytics: Pay attention to your website’s mobile traffic in Google Analytics. Track metrics like bounce rate, time on page, and conversion rates for mobile users. Identify any areas where mobile users might be struggling.
    3. Stay Updated with Mobile Trends: The mobile web landscape is constantly evolving. Stay informed about the latest trends and best practices in mobile optimization to ensure your website continues to provide a great experience for mobile visitors in April 2025.

    My Personal Insights on Mobile Optimization (April 2025)

    Having witnessed the shift towards mobile-first Browse, I can confidently say that optimizing your website for mobile traffic is paramount for success in April 2025. It’s not just about making your website look good on a small screen; it’s about providing a fast, seamless, and user-friendly experience that caters to the needs of your mobile audience. By focusing on responsive design, page speed, mobile-friendly content, and intuitive navigation, you can tap into the vast potential of mobile traffic and achieve your online goals.