Even a brand-new Windows 11 laptop can start feeling sluggish over time. This slowdown isn’t necessarily due to faulty hardware but often stems from software accumulation, inefficient settings, or improper maintenance. Common reasons for a slow Windows 11 experience include:
- Too many startup programs: Applications configured to launch automatically when you boot your laptop can consume significant resources (RAM and CPU) before you even start working.
- Insufficient storage space: When your main drive (especially the C: drive) is nearly full, Windows struggles to perform essential tasks like creating temporary files, updating, and operating efficiently.
- Excessive temporary files and cache: Over time, your system and applications generate numerous temporary files, browser caches, and old update files that can clutter your storage and slow down access.
- Background processes: Many applications continue to run in the background, consuming CPU cycles and RAM even when you’re not actively using them.
- Outdated drivers or operating system: Old drivers can cause performance bottlenecks or instability. Missing Windows updates might mean you’re lacking crucial performance optimizations or bug fixes.
- Visual effects: Windows 11 features sleek animations and visual effects that, while aesthetically pleasing, can strain lower-end hardware.
- Malware or viruses: Malicious software can run hidden processes, consume resources, and compromise system performance.
- Fragmented hard drive (for HDDs): While less of an issue for SSDs, traditional Hard Disk Drives (HDDs) can become fragmented, meaning data is scattered across the disk, leading to slower read/write times.
- Aging hardware: Eventually, even with perfect software optimization, older hardware may simply not keep up with the demands of modern software and operating systems.
Understanding these underlying causes is the first step in effectively troubleshooting and speeding up your Windows 11 laptop.
The Evolution of PC Performance Optimization: From the early days of computing, managing system resources has been key to performance. Tools like Disk Defragmenter, first popularized in MS-DOS and Windows 95, were essential for HDDs. The shift to Solid State Drives (SSDs) significantly reduced the need for defragmentation. Modern operating systems like Windows 11 now focus more on background process management, startup optimization, and cloud-based features to maintain responsiveness, reflecting a broader trend towards highly integrated and automatically managed computing environments.
How to Speed Up a Slow Windows 11 Laptop
Here’s a comprehensive guide to optimizing your Windows 11 laptop for better performance, from simple tweaks to deeper system adjustments.
Step 1: Restart Your Laptop Regularly
This is the simplest yet often most effective first step. A restart clears temporary files, closes unnecessary background processes, and refreshes system memory.
- Action: Click the Start button, then the Power icon, and select “Restart.”
- Frequency: Make it a habit to restart your laptop at least once a day, or if you notice it’s starting to slow down. Avoid simply closing the lid, which often just puts it to sleep.
Step 2: Manage Startup Apps
Too many programs launching with Windows can significantly prolong boot times and consume resources immediately.
- How to Access Startup Apps:
- Right-click the Start button (or press Windows key + X).
- Select “Task Manager.”
- In Task Manager, click on the “Startup apps” tab.
- How to Disable:
- You’ll see a list of applications and their “Startup impact.”
- Identify apps you don’t need to run immediately when Windows starts (e.g., Spotify, Steam, Adobe Creative Cloud apps, messaging clients, cloud sync tools if you don’t use them constantly).
- Right-click on the app you want to disable and select “Disable.”
- Action: Disable anything that doesn’t need to run from the moment you log in. This will free up RAM and CPU cycles. You can always launch these apps manually when you need them.
Step 3: Free Up Disk Space
A full drive can severely hamper Windows 11’s performance, especially if it’s an SSD (Solid State Drive). Aim to keep at least 15-20% of your primary drive (C:) free.
- Using Disk Cleanup:
- Action: Search for “Disk Cleanup” in the Windows Search bar and open it.
- Select your C: drive and click “OK.”
- Action: Let it scan. Then, click “Clean up system files.”
- Select the C: drive again.
- Check boxes next to items you want to remove (e.g., Temporary Internet Files, Recycle Bin, Temporary files, Windows Update Cleanup, Delivery Optimization Files). Be cautious with “Downloads” if you have important files there.
- Click “OK” and then “Delete Files.”
- Uninstall Unused Programs:
- Action: Go to Settings > Apps > Installed apps.
- Scroll through the list and uninstall any programs you no longer use. Right-click on the app and select “Uninstall.”
- Move Large Files: Transfer large files (videos, photos, old games) from your C: drive to an external hard drive or cloud storage.
- Action: Regularly check your storage status by going to Settings > System > Storage. This gives you a visual breakdown of what’s consuming space.
Step 4: Adjust Visual Effects for Performance
Windows 11 boasts a sleek interface with animations and transparency, which can impact performance on less powerful hardware.
- How to Adjust:
- Action: Search for “Adjust the appearance and performance of Windows” in the Windows Search bar and open it.
- In the “Performance Options” window, select the “Visual Effects” tab.
- Action: Choose “Adjust for best performance.” This will disable most animations and visual flair.
- Alternatively, select “Custom” and uncheck effects you don’t need (e.g., “Animate windows when minimizing and maximizing,” “Fade or slide menus into view,” “Smooth-scroll list boxes”).
- Click “Apply,” then “OK.”
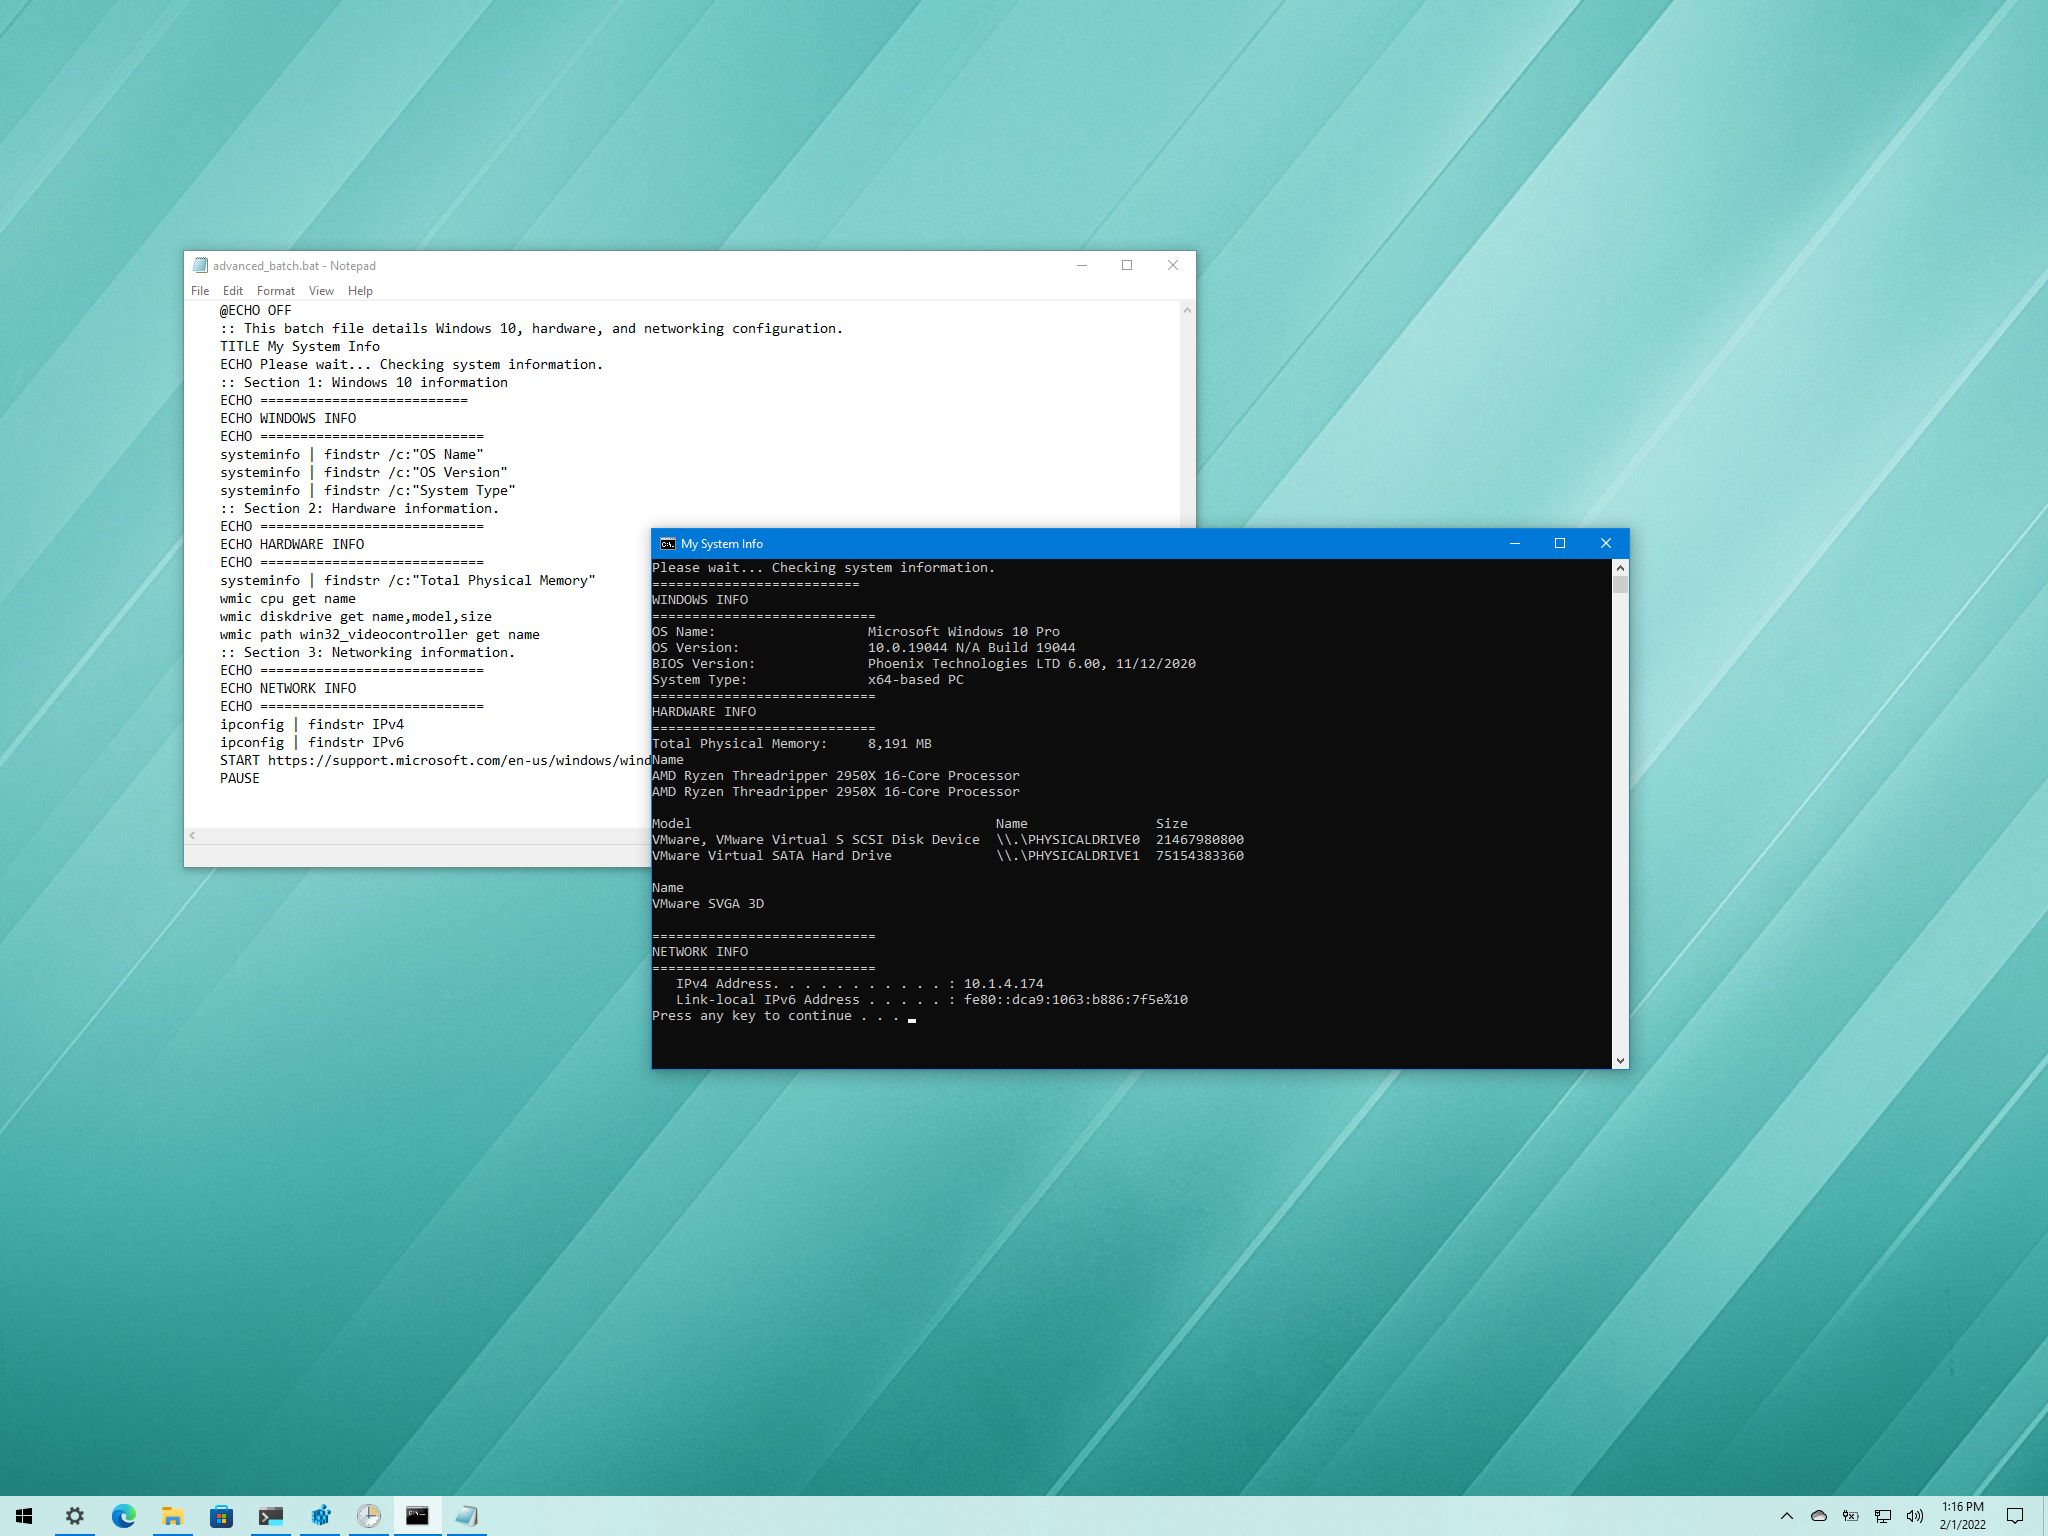
Step 5: Update Drivers and Windows 11
Outdated or corrupted drivers can cause slowdowns and system instability. Keeping Windows 11 itself updated ensures you have the latest performance optimizations and bug fixes.
- Update Windows 11:
- Action: Go to Settings > Windows Update.
- Click “Check for updates.”
- Action: Download and install any available updates. Restart your laptop if prompted.
- Update Device Drivers:
- Action: Go to Settings > Windows Update > Advanced options > Optional updates. Check for any available driver updates and install them.
- For Graphics Drivers: Visit the website of your graphics card manufacturer (NVIDIA, AMD, Intel) to download the latest drivers directly. These often provide significant performance improvements for gaming and intensive applications.
- For other drivers: If you suspect a specific component (e.g., Wi-Fi, audio) is causing issues, visit your laptop manufacturer’s website (Dell, HP, Lenovo, ASUS, Acer, etc.) and download the latest drivers for your specific model.
- Action: Ensure your system is always running the most current software and drivers.
Step 6: Manage Background Apps
Many apps continue to run in the background even after you close them, consuming resources.
- How to Manage:
- Action: Go to Settings > Apps > Apps & features. (For Windows 11, it’s “Installed apps”).
- Click the three vertical dots next to an app, select “Advanced options” (if available).
- Action: Under “Background app permissions,” choose “Never” for apps you don’t need running in the background. Or, select “Optimized for performance” if available.
- Task Manager for Real-Time Monitoring:
- Action: Right-click the Start button > “Task Manager.”
- In the “Processes” tab, sort by “CPU,” “Memory,” or “Disk” usage to identify resource-hungry applications.
- Action: If you find an app consuming excessive resources and you’re not actively using it, select it and click “End task” (but be careful not to end system processes).
- Action: Be selective about which apps are allowed to run in the background.
Step 7: Check for and Remove Malware
Malware can significantly slow down your system and compromise your security.
- Using Windows Security:
- Action: Go to Settings > Privacy & security > Windows Security.
- Click “Virus & threat protection.”
- Click “Quick scan” or “Scan options” for a full scan.
- Third-Party Antivirus (Optional): If you suspect a stubborn infection, consider a full scan with a reputable third-party antivirus program like Malwarebytes, Avast, or Bitdefender.
- Action: Regularly scan your system for threats and remove any found.
Step 8: Disable Unnecessary Notifications and Tips
Constant notifications and system tips can be distracting and use up background resources.
- How to Disable:
- Action: Go to Settings > System > Notifications.
- Toggle off notifications for apps you don’t need alerts from.
- Action: Scroll down and uncheck “Offer suggestions on how I can set up my device” and “Get tips and suggestions when I use Windows.”
- Action: This can reduce background activity and system interruptions.
Step 9: Optimize Drives (Defragment or Trim)
This step helps organize data on your storage drive for faster access.
- For HDDs (Hard Disk Drives):
- Action: Search for “Defragment and Optimize Drives” in Windows Search and open it.
- Select your C: drive (or any HDD).
- Click “Optimize.”
- For SSDs (Solid State Drives):
- Action: For SSDs, Windows automatically performs TRIM operations, which optimize performance. You typically don’t need to manually defragment an SSD. The “Optimize” tool will correctly run TRIM for SSDs.
- Action: Run this optimization periodically, especially for HDDs.
Step 10: Adjust Power Mode
Your laptop’s power settings can impact performance.
- How to Adjust:
- Action: Click the Battery icon in the taskbar.
- Adjust the Power mode slider to “Best performance” or “Best power efficiency” depending on your needs. For speed, choose “Best performance.”
- Action: For more granular control, go to Settings > System > Power & battery > Power mode.
- Action: Keep in mind that “Best performance” will consume more battery power.
Step 11: Consider Hardware Upgrades (If Software Fixes Fail)
If your Windows 11 laptop remains persistently slow despite all software optimizations, your hardware might be the bottleneck.
- Upgrade to an SSD: If your laptop still uses a traditional HDD (Hard Disk Drive), upgrading to an SSD (Solid State Drive) is the single most impactful upgrade for performance. SSDs are exponentially faster than HDDs.
- Increase RAM: If you frequently multitask or use demanding applications, increasing your RAM (Random Access Memory) (e.g., from 8GB to 16GB) can significantly improve responsiveness and prevent slowdowns.
- Action: Consult your laptop’s manufacturer or a computer technician to determine compatible upgrade options.
Frequently Asked Questions (FAQ)
Q1: Why is my new Windows 11 laptop already slow?
Even new laptops can be slow due to:
- Bloatware: Pre-installed, unnecessary software from the manufacturer.
- Too many startup apps: Many apps configure themselves to run at startup by default.
- Updates: Large Windows updates can temporarily slow down a system while they integrate.
- Default settings: Windows 11’s default visual effects can be taxing on entry-level hardware.
- HDD instead of SSD: Some entry-level laptops still come with slower HDDs.
Q2: Will freeing up disk space really speed up my laptop?
Yes, absolutely. When your primary drive (especially the C: drive) is nearly full, Windows struggles to manage temporary files, perform updates, and use virtual memory (paging file) efficiently. Keeping adequate free space (ideally 15-20% or more) is crucial for smooth operation.
Q3: How much RAM do I need for Windows 11 to run smoothly?
While Windows 11 officially requires a minimum of 4GB RAM, 8GB is considered the practical minimum for smooth general use, multitasking, and web Browse. For demanding tasks like gaming, video editing, or graphic design, 16GB or more is highly recommended.
Q4: Should I disable Windows animations to speed up my laptop?
If your laptop has limited resources (e.g., 4GB-8GB RAM, older CPU, or integrated graphics), disabling visual effects and animations (like transparency and fading effects) can indeed free up system resources and make the interface feel snappier and more responsive.
Q5: Is it better to “Cloud download” or “Local reinstall” when resetting Windows 11 for speed? A5: For optimal speed and to ensure you’re starting with the cleanest possible system, “Cloud download” is generally preferred. It downloads a fresh, untainted copy of Windows, bypassing any potential corruption in your local recovery files. However, it requires a stable and reasonably fast internet connection.
Q6: Can malware cause my Windows 11 laptop to slow down significantly? A6: Yes, definitively. Malware and viruses often run hidden processes in the background, consume excessive CPU and RAM, generate network traffic, or interfere with system functions, all of which can lead to a significant slowdown of your Windows 11 laptop. Regular scans with reputable antivirus software are essential.