Category: Uncategorized

  • How to Create and Run Batch Files in Windows

    How to Create and Run Batch Files in Windows

    Have you ever found yourself performing the same sequence of tasks on your Windows operating system repeatedly? Whether it’s cleaning temporary files, launching multiple applications, or organizing documents, these repetitive actions can be time-consuming. This is where batch files come in. A batch file is a simple, yet powerful scripting tool that allows you to automate these tasks by executing a series of Command Prompt (CMD) commands sequentially.

    Born from the MS-DOS era and deeply integrated into Windows, batch files (identified by the .bat or .cmd file extension) offer a straightforward way to automate routine computer operations without needing complex programming knowledge. Think of it as writing a mini-program for your computer using plain text commands.

    This guide will walk you through the process of creating your first batch file, understanding essential commands, and running your automated scripts.

    Part 1: Understanding Basic Batch File Concepts

    • Commands: Instructions typed into the Command Prompt (e.g., cd, del, echo).
    • Syntax: The rules for writing those commands.
    • Variables: Placeholders for data (e.g., %date%).
    • Comments: Use REM or :: for comments that are ignored during execution.
    • @echo off: Prevents the script from displaying each command as it runs.

    Part 2: Creating Your First Batch File
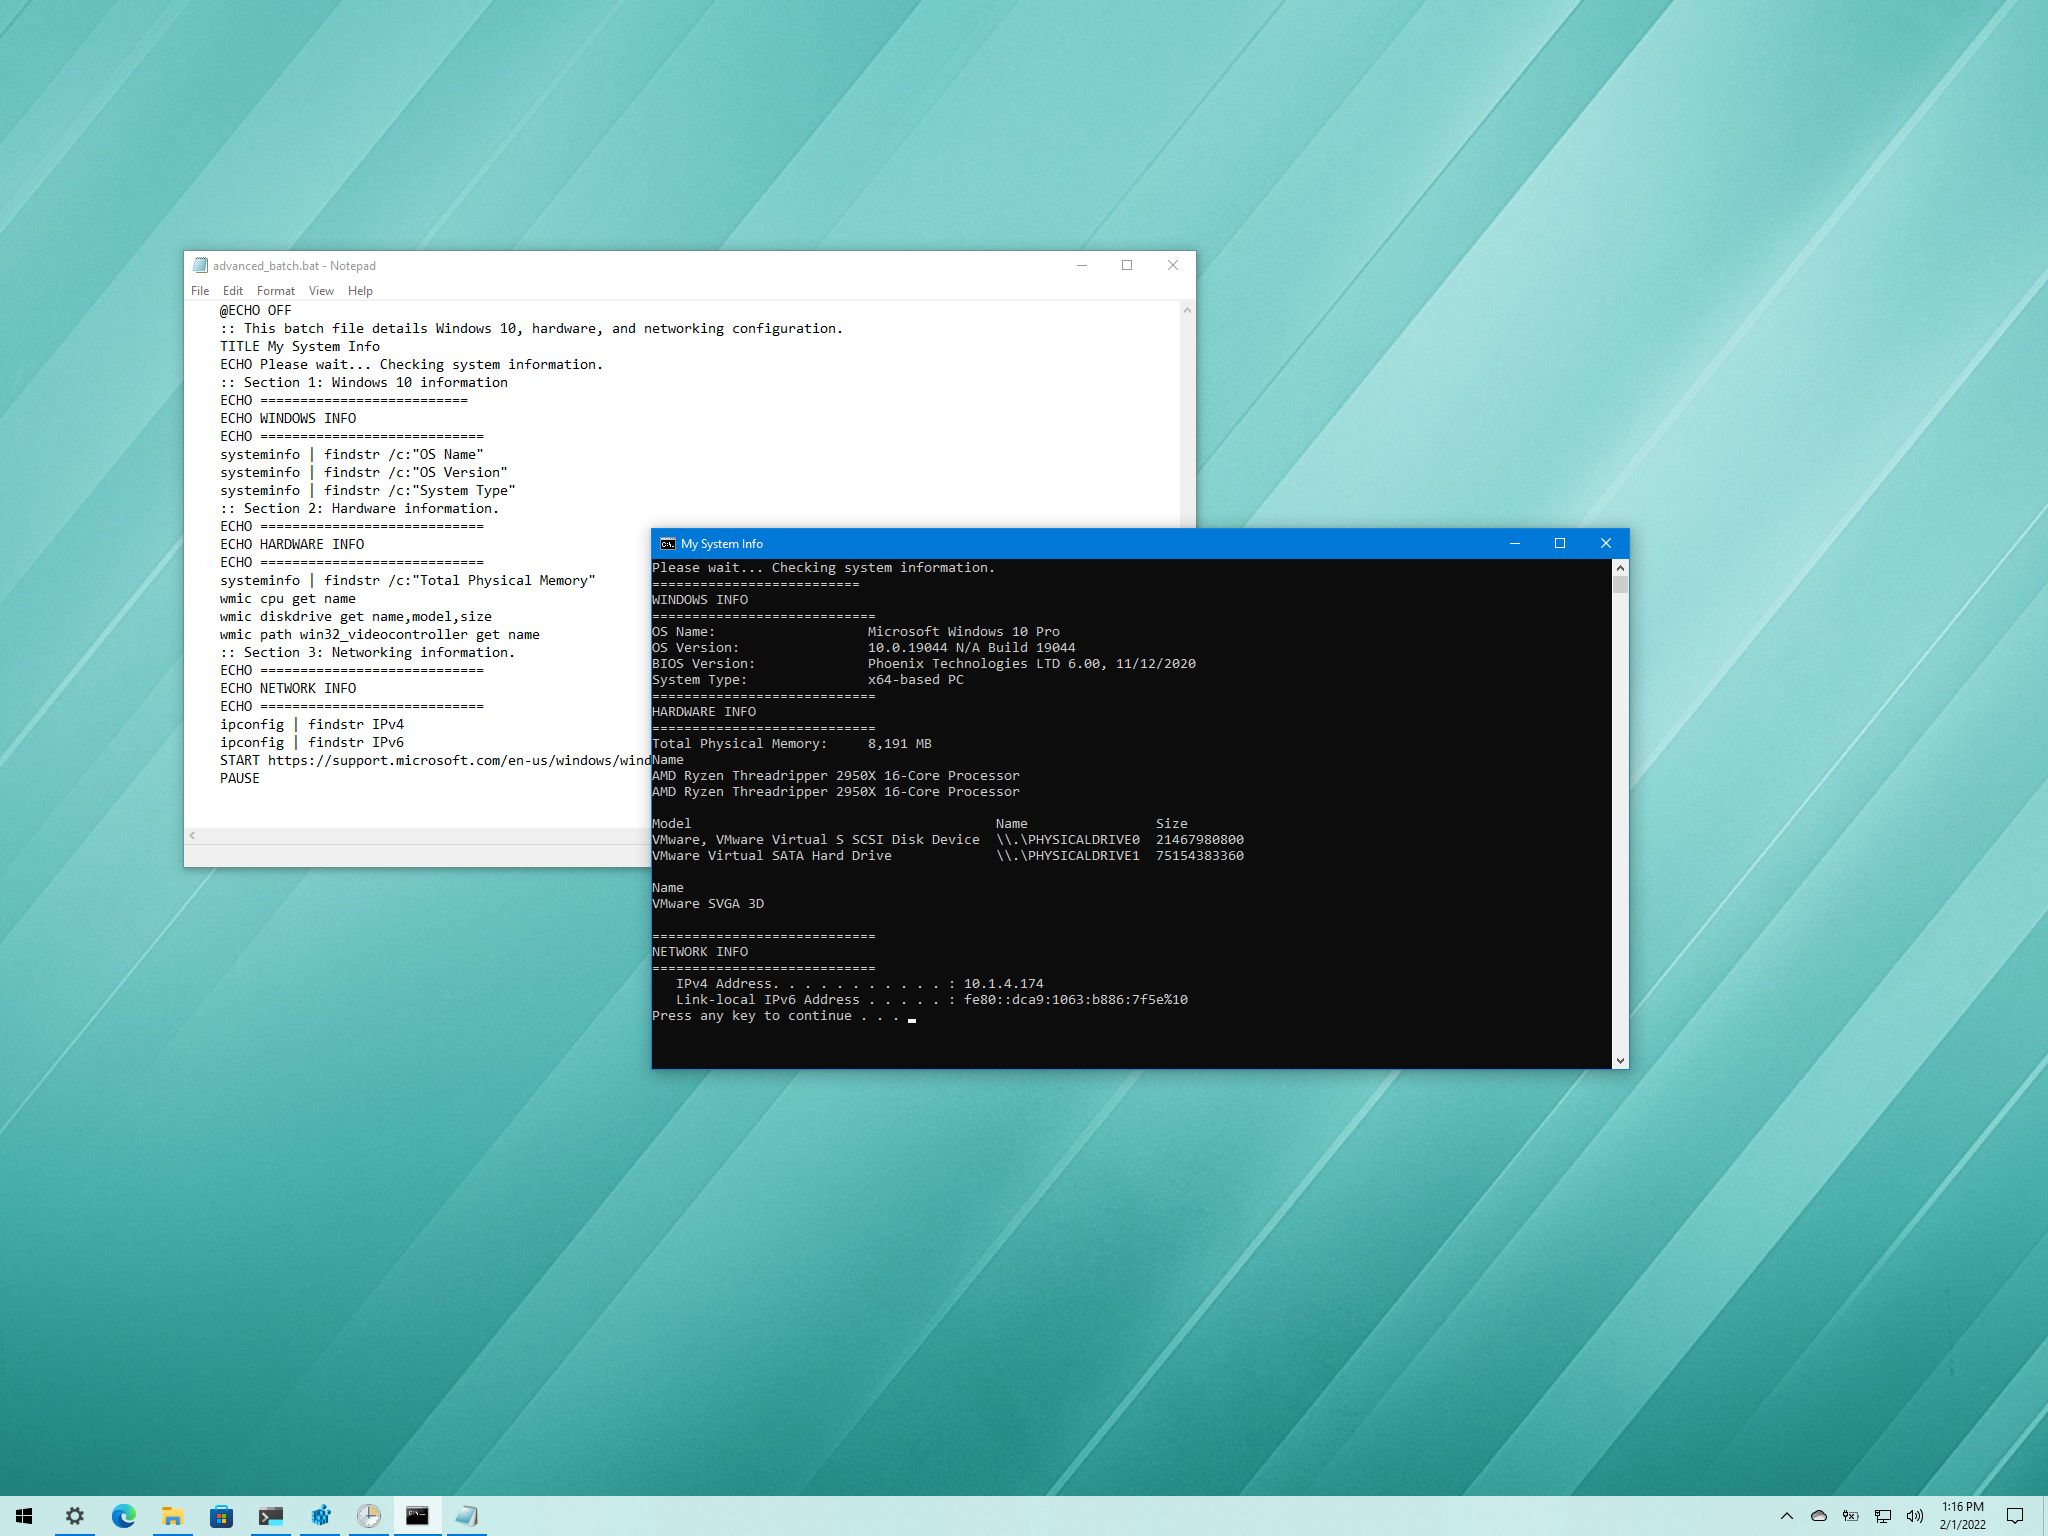
    1. Open Notepad.
    2. Enter the following script:
    3. @echo off
    4. REM This is my first batch file
    5. echo Hello, Batch World!
    6. echo.
    7. echo This file will open Notepad in 5 seconds…
    8. timeout /t 5 /nobreak
    9. start notepad.exe

    exit

    1. Save the file:
      • File > Save As…
      • Name it something like MyFirstScript.bat
      • Set “Save as type” to “All Files”

    Part 3: Running Your Batch File

    • Double-click the .bat file to execute it.
    • Run from Command Prompt:
      • cd to the file’s directory
      • Type MyFirstScript.bat
    • Run as Administrator:
      • Right-click > Run as administrator (required for system-level changes)

    Part 4: Useful Batch File Commands and Examples

    • Navigation:
      • cd C:\Path\To\Folder
      • cd .. (go up a directory)
    • File Management:
      • copy, move, del, rmdir
    • Pause and Output:
      • pause, echo, timeout
    • Open URLs or Files:
      • start https://www.example.com
    • Variables and Input:
      • set name=User
      • echo %name%
      • set /p userinput=Enter something:

    Example: Cleanup Script

    @echo off

    echo Running system cleanup…

    del /s /q %TEMP%\*.* > nul 2>&1

    del /s /q C:\Windows\Temp\*.* > nul 2>&1

    echo Cleanup complete!

    pause

    exit

    Part 5: Advanced Tips for Batch Files

    • Use IF EXIST for safer file operations
    • Loop through files with FOR loops
    • Schedule batch files using Task Scheduler
    • Always test scripts on non-critical data first
    • Use comments (REM) to document your script logic

    Batch files offer a powerful entry point into automation on the Windows platform. Mastering their use can dramatically improve your productivity.

    Frequently Asked Questions (FAQ)

    Q1: What is a batch file, and what is it used for?

    A batch file is a plain text file with a .bat or .cmd extension containing a sequence of CMD commands for automating tasks in Windows.

    Q2: How do I create a batch file?

    Use Notepad, type your commands, and save the file with a .bat extension. Select “All Files” in the save dialog to avoid saving it as .txt.

    Q3: Why does my batch file close immediately?

    It runs quickly and exits. Add pause at the end to keep the window open.

    Q4: Can batch files delete files or folders?

    Yes, using del and rmdir. Be very cautious with these commands, especially with recursive options (/s).

    Q5: How do I run a batch file as administrator?

    Right-click on the .bat file and select “Run as administrator.”

  • How to Open Windows Registry Editor Safely

    How to Open Windows Registry Editor Safely

    The Windows Registry Editor is a powerful tool that gives you access to the configuration database used by Windows and many installed applications. It allows you to view and modify registry keys and values that control system behavior, application settings, and low-level configurations. While incredibly useful, editing the registry can be risky if done incorrectly. I’ve used it extensively for troubleshooting, system optimization, and enabling hidden Windows features—but always with caution.

    In this article, I’ll explain how to open Windows Registry Editor safely, step by step. I’ll also include best practices, safety tips, and what you should (and shouldn’t) do once inside the registry.

    SEO Meta Description:

    Learn how to open Windows Registry Editor safely and correctly. Step-by-step guide with precautions and best practices for secure registry access.

    What Is the Windows Registry Editor?

    The Registry Editor (Regedit) is a built-in Windows tool used to view and change registry settings. These settings control hardware, software, user preferences, startup programs, and more.

    The registry is structured like a hierarchy of folders and values, known as:

    • Hives (e.g., HKEY_LOCAL_MACHINE)
    • Keys (like folders)
    • Values (like file contents)

    Even small mistakes in the registry can cause serious issues. That’s why it’s important to open and use it safely.

    Why You Might Need to Open the Registry Editor

    You may need to use Registry Editor for:

    • Fixing system errors or bugs
    • Enabling or disabling hidden features
    • Customizing UI elements (like context menus or taskbar behavior)
    • Repairing broken file associations
    • Adjusting advanced system settings

    I’ve often used it to remove leftover entries from uninstalled apps or to tweak settings not available in the Windows GUI.

    Step-by-Step Guide: How to Open the Registry Editor Safely

    Step 1: Save Your Work

    Before launching Registry Editor, close any open applications and save your work. Some registry changes may require a reboot.

    Step 2: Create a System Restore Point (Highly Recommended)

    This step ensures that you can revert to a working system if something goes wrong.

    How to create a restore point:

    1. Press Windows + S, type Create a restore point, and press Enter
    2. In the System Properties window, click Create
    3. Name the restore point (e.g., “Before Registry Edit”)
    4. Click Create and wait for confirmation

    I never skip this step when editing the registry, even for minor changes.

    Step 3: Open Registry Editor

    There are several ways to launch the Registry Editor. Choose any of the following:

    Method 1: Using the Run Command

    1. Press Windows + R
    2. Type: regedit
    3. Press Enter or click OK
    4. If prompted by User Account Control, click Yes

    This is the fastest and most common method.

    Method 2: From Start Menu Search

    1. Press Windows key
    2. Type Registry Editor or regedit
    3. Click on the matching result
    4. Approve the User Account Control prompt

    This method works well if you’re not a fan of keyboard shortcuts.

    Method 3: From Command Prompt or PowerShell

    1. Open Command Prompt or PowerShell (press Windows + X, then select one)
    2. Type: regedit
    3. Press Enter

    This is useful during scripting or troubleshooting in admin environments.

    Step 4: Navigate the Registry Safely

    Once Registry Editor opens:

    • The left pane shows the registry hives
    • The right pane shows keys and their values
    • Use the address bar to jump directly to a path (e.g., HKEY_CURRENT_USER\Software\Microsoft\Windows\CurrentVersion\Run)

    Avoid randomly clicking or editing values unless you know what you’re doing.

    Best Practices for Safe Registry Use

    1. Back Up a Registry Key Before Editing

    You can back up specific keys before modifying them.

    Steps:

    1. Right-click on the key you plan to edit
    2. Select Export
    3. Choose a location and name the .reg file
    4. Save it

    If anything goes wrong, double-clicking this file will restore the original settings.

    1. Avoid Deleting Keys Unless Absolutely Necessary

    Instead of deleting, try renaming the key or changing the value to disable it. This way, you can revert easily if something breaks.

    1. Double-Check Registry Paths

    Typing or pasting incorrect paths can lead to editing the wrong key. Always verify the full path before proceeding.

    1. Close Registry Editor After Use

    Leaving it open can lead to accidental changes. Once done, File > Exit or simply close the window.

    Common Registry Paths and Their Purpose

    Registry Path Purpose
    HKEY_LOCAL_MACHINE\Software\Microsoft\Windows\CurrentVersion\Run Controls apps that run on system startup
    HKEY_CLASSES_ROOT\.filetype Controls file associations
    HKEY_CURRENT_USER\Control Panel\Desktop Personal desktop settings (e.g., wallpaper, delay times)
    HKEY_LOCAL_MACHINE\SYSTEM\CurrentControlSet\Services Driver and service configurations

    I frequently access the Run path to manage startup applications manually when Task Manager isn’t showing everything.

    What Not to Do in the Registry

    • Don’t experiment randomly with keys you don’t understand
    • Don’t use registry “cleaner” tools—they often remove valid entries
    • Don’t delete large hives or unknown folders
    • Don’t change hardware driver settings unless you’re confident

    How to Restore the Registry (If Something Goes Wrong)

    Option 1: Use the Exported .reg File

    1. Double-click the file you exported earlier
    2. Confirm that you want to add the information to the registry
    3. Restart your computer

    Option 2: Use System Restore

    If you created a restore point:

    1. Press Windows + S, type System Restore, and open it
    2. Select System Restore > Next
    3. Choose your restore point
    4. Follow the prompts to restore your system

    This has saved me more than once when a faulty registry tweak prevented a program from starting properly.

    Conclusion

    Opening the Windows Registry Editor safely is crucial for anyone wanting to customize system settings, fix errors, or improve performance. It’s a powerful tool—but also one that should be handled with care. By following the steps in this guide, including creating a restore point and backing up registry keys, you reduce the risk of accidental damage and maintain control over your system configuration.

    From personal experience, Registry Editor has helped me solve stubborn issues that GUI-based settings couldn’t fix. Just make sure to take precautions, verify your changes, and proceed methodically.

  • How to Fix No Sound Issue in Windows 11

    How to Fix No Sound Issue in Windows 11

    Experiencing no sound on your Windows 11 PC can be frustrating. This issue can stem from various causes, including driver problems, settings errors, or hardware malfunctions. This guide explains effective, easy-to-follow steps to diagnose and fix the no sound problem on Windows 11, drawing from up-to-date sources and personal troubleshooting experience.

    Step 1: Check Basic Hardware Connections

    Before digging into software fixes, verify hardware setup:

    • Ensure your speakers or headphones are properly plugged in.
    • Confirm the volume on speakers or headphones is turned up.
    • Test with a different audio device or port if possible.
    • Check if external devices have their own mute or volume controls.

    Simple connection issues often cause no sound problems.

    Step 2: Verify Windows Volume and Sound Settings

    Windows sound settings can mute or lower audio inadvertently:

    • Click the speaker icon on the taskbar.
    • Ensure volume is not muted and is set to a reasonable level.
    • Open Settings > System > Sound.
    • Check the Output device is correctly set (e.g., speakers or headphones you are using).
    • Click App volume and device preferences to verify individual app sound levels.

    I have found that resetting these settings often resolves silent audio issues.

    Step 3: Run Windows Audio Troubleshooter

    Windows 11 includes a built-in troubleshooter for sound problems:

    • Go to Settings > System > Troubleshoot > Other troubleshooters.
    • Find Playing Audio and click Run.
    • Follow on-screen prompts to detect and fix issues.

    This automated tool can identify common problems quickly.

    Step 4: Restart Windows Audio Services

    Audio depends on background services that may sometimes stop:

    • Press Windows + R, type services.msc, and press Enter.
    • Locate Windows Audio service.
    • Right-click it and select Restart.
    • Also, ensure the service startup type is set to Automatic.

    Restarting services can restore sound functionality.

    Step 5: Update or Reinstall Audio Drivers

    Outdated or corrupted drivers are common culprits.

    • Press Windows + X and select Device Manager.
    • Expand Sound, video and game controllers.
    • Right-click your audio device and select Update driver.
    • Choose Search automatically for drivers.
    • If updating doesn’t work, right-click and select Uninstall device, then restart your PC to reinstall drivers automatically.

    Personally, reinstalling audio drivers resolved persistent no sound issues.

    Step 6: Check Audio Output Format and Enhancements

    Incorrect audio formats or enhancements can cause silence:

    • Go to Settings > System > Sound > More sound settings.
    • Select your output device and click Properties.
    • Under the Advanced tab, set the default format to 24 bit, 48000 Hz (Studio Quality) or lower if necessary.
    • Disable all sound enhancements under the Enhancements tab by checking Disable all enhancements.
    • Click Apply and test audio.

    Changing these settings helped me regain sound on several occasions.

    Step 7: Disable Exclusive Mode

    Some applications take exclusive control of audio devices:

    • In the same Properties > Advanced tab, uncheck Allow applications to take exclusive control of this device.
    • Apply changes and test sound.

    This prevents apps from blocking system-wide audio.

    Step 8: Check for Windows Updates

    System updates often fix bugs affecting audio:

    • Open Settings > Windows Update.
    • Click Check for updates and install any available.

    Staying updated ensures compatibility and bug fixes.

    Step 9: Restore System to an Earlier Point

    If the issue started recently:

    • Search Create a restore point in Windows search.
    • Open System Restore and choose a restore point before the problem began.
    • Follow prompts to restore your system.

    Restoring often fixes recent configuration errors.

    Step 10: Inspect Hardware Issues

    If none of the above work, hardware might be faulty:

    • Test audio devices on another PC.
    • Try a different audio cable or port.
    • Consider internal hardware checks or professional repair.

    Conclusion

    The no sound issue in Windows 11 can arise from simple settings errors to driver or hardware problems. Following the above systematic steps will help diagnose and fix the issue in most cases. Regular maintenance like driver updates and system checks prevents future sound failures.

  • How to Enable Dark Mode in Windows 11

    How to Enable Dark Mode in Windows 11

    Windows 11 brings a fresh and modern design with customizable features to enhance user experience. One such feature is Dark Mode, which changes the system interface to darker colors. This mode helps reduce eye strain, especially in low-light environments, and can save battery life on devices with OLED screens. This article guides you step-by-step on how to enable Dark Mode in Windows 11, covering all settings and customization options you need to know.

    What Is Dark Mode?

    Dark Mode changes the color scheme of Windows and supported apps to darker tones, replacing bright backgrounds with black or gray shades. It applies to:

    • Windows system interface (taskbar, Start menu, Settings)
    • Microsoft apps like Mail, Calendar, and File Explorer
    • Compatible third-party apps

    Why Use Dark Mode?

    • Reduces eye strain in dim environments.
    • Improves readability by reducing screen glare.
    • Saves battery life on OLED and AMOLED displays.
    • Provides a modern aesthetic preferred by many users.

    Step 1: Open Windows Settings

    • Click on the Start menu or press Windows + I to open Settings.
    • Settings is the central hub for managing Windows features.

    Step 2: Navigate to Personalization

    • In the Settings window, select Personalization from the left sidebar.
    • This section controls themes, colors, backgrounds, and more.

    Step 3: Access Color Settings

    • Click on Colors in the Personalization menu.
    • This page controls the color mode and accent colors of your system.

    Step 4: Enable Dark Mode

    • Under Choose your mode, you will see three options: Light, Dark, and Custom.
    • Select Dark to apply the dark theme system-wide immediately.

    Step 5: Customize Accent Colors (Optional)

    • Scroll down to Accent color.
    • You can choose to have Windows automatically pick an accent color from your background or select one manually.
    • The accent color affects highlights, buttons, and taskbar highlights, complementing Dark Mode.

    Step 6: Use Custom Mode for Mixed Appearance

    • Selecting Custom lets you use Light mode for Windows interface and Dark mode for apps, or vice versa.
    • Under Choose your default Windows mode, select Light or Dark.
    • Under Choose your default app mode, select Light or Dark.
    • This flexibility allows tailoring the experience per preference.

    Step 7: Enable Dark Mode in File Explorer and Other Apps

    • Dark Mode applies to File Explorer automatically when enabled in system settings.
    • Many Microsoft apps like Mail, Calendar, and Microsoft Edge will also follow the system dark theme.
    • Some third-party apps may need manual dark mode activation in their own settings.

    Step 8: Quick Toggle Using Action Center

    • Open the Action Center by clicking the network, sound, or battery icon in the taskbar or pressing Windows + A.
    • Look for the Dark Mode or Night Light toggle (depending on your version).
    • Click it to enable or disable Dark Mode quickly without opening Settings.

    Step 9: Schedule Dark Mode (Night Mode)

    Windows 11 also lets you schedule Dark Mode to activate automatically at certain times.

    • Go to Settings > Personalization > Colors.
    • Scroll to Choose your color mode, select Custom.
    • Use Night light settings (in Display settings) to reduce blue light in the evening, which complements Dark Mode for eye comfort.
    • Third-party tools are available for advanced scheduling.

    Troubleshooting and Tips

    • Dark Mode not applying fully? Restart your computer to ensure all apps reflect the change.
    • Some apps stay in light mode? Check app-specific settings, as some require manual dark mode activation.
    • Battery not improving? Dark Mode saves battery mainly on OLED screens; on LCD screens, the effect is minimal.
    • Use third-party themes cautiously, as they can cause instability.

    Personal Experience

    From personal use, enabling Dark Mode on Windows 11 significantly reduced eye fatigue during late-night work sessions. The blend of dark system UI with accent colors enhances focus and visual comfort. Scheduling Dark Mode to switch on automatically made the transition seamless and effortless.

    Conclusion

    Enabling Dark Mode in Windows 11 is a simple process that enhances usability and aesthetics. Whether you prefer a full dark experience or a custom mix, Windows 11 offers flexible options. Following this guide ensures you activate and customize Dark Mode to suit your preferences and working conditions.

  • How to Create a Password-Protected Folder in Windows

    How to Create a Password-Protected Folder in Windows

    rotecting your sensitive files on Windows is important to maintain privacy and security. While Windows does not have a direct built-in option to password-protect individual folders, there are effective methods to secure your data. This guide explains how to create a password-protected folder on Windows using built-in encryption, compression with password, and third-party tools — all without diving into coding or scripts.

    Why Protect a Folder with a Password?

    Password-protecting a folder helps you:

    • Prevent unauthorized access to personal or confidential files.
    • Secure sensitive documents, photos, or work files.
    • Maintain privacy on shared or public computers.
    • Add an extra security layer beyond your Windows user account password.

    Important Things to Know Before You Start

    • Windows does not offer direct password protection for folders in most editions.
    • You can use encryption features, password-protected compressed files, or third-party apps.
    • Always backup your important data before securing it.
    • Losing passwords may result in permanent loss of access.

    Method 1: Use Windows Built-in Encryption (EFS)

    Windows has a feature called Encrypting File System (EFS) that encrypts files and folders so only your user account can access them.

    How to Use Windows Encryption

    1. Right-click the folder you want to protect.
    2. Select Properties.
    3. In the General tab, click Advanced.
    4. Check the box for Encrypt contents to secure data.
    5. Click OK, then Apply.
    6. Choose whether to encrypt only the folder or the folder and its subfolders/files.
    7. Click OK again.

    Your folder is now encrypted and can only be opened when logged into your user account.

    Note: This protects your folder from other users on the same PC but does not prompt for a password every time.

    Method 2: Create a Password-Protected ZIP File

    If you want password protection that prompts for a password when opening, you can compress the folder into a password-protected archive using software like 7-Zip or WinRAR.

    How to Create a Password-Protected Archive

    1. Download and install 7-Zip or WinRAR (both are reliable and free to use).
    2. Right-click on the folder you want to protect.
    3. Choose Add to archive or Compress.
    4. In the settings window, find the Encryption section.
    5. Enter a strong password and select the encryption method (AES-256 is recommended).
    6. Create the archive.

    Now, whenever someone tries to open this compressed file, they must enter the password to access its contents.

    Method 3: Use Third-Party Folder Locking Software

    There are many third-party applications designed specifically for password-protecting folders. These tools offer user-friendly interfaces and strong security features.

    Popular Third-Party Tools

    • Folder Lock: Easy to use with strong encryption and password protection.
    • Protected Folder by IObit: Lightweight app to quickly lock folders.
    • VeraCrypt: For more advanced users, creates encrypted volumes that act like password-protected folders.

    Using these apps typically involves installing the software, selecting the folder to protect, and setting a password. The folder then becomes inaccessible without the password.

    Tips for Managing Password-Protected Folders

    • Always remember or securely store your passwords; otherwise, you risk losing access.
    • Keep backup copies of important data before encrypting or locking.
    • For sharing files securely, password-protected archives are ideal.
    • Use encryption if you want seamless protection for your own user account.
    • Combine password protection with Windows user account passwords for layered security.

    Troubleshooting Common Issues

    • If encrypted folders don’t open on another user account, that is normal — only your account can access them.
    • Password-protected archives require correct software to open; make sure the recipient has compatible tools.
    • Some third-party apps may conflict with antivirus software; download only from trusted sources.
    • If you lose a password for third-party tools, recovery is often impossible — be cautious.

    My Experience Creating Password-Protected Folders

    I prefer using 7-Zip to create password-protected archives for sharing sensitive files. It’s simple and widely supported. For private use on my PC, I rely on Windows encryption because it integrates well and avoids extra steps. Third-party folder lockers are useful but I ensure I use reputable software to avoid security risks.

    Summary

    While Windows does not offer a straightforward “password protect folder” button, you can secure folders by:

    • Encrypting folders using Windows’ Encrypting File System (EFS).
    • Creating password-protected ZIP archives using tools like 7-Zip or WinRAR.
    • Using third-party folder locking software for more direct password protection.

    Choose the method that fits your security needs and technical comfort level.

  • How to Connect Bluetooth Devices to Windows laptop

    How to Connect Bluetooth Devices to Windows laptop

    Connecting Bluetooth devices to a Windows laptop has become a routine task for many users. Whether it’s a pair of wireless headphones, a Bluetooth mouse, keyboard, speaker, or even a smartphone, Bluetooth technology allows seamless wireless communication without the need for cables.

    This guide is based on hands-on experience and up-to-date research. It offers a complete step-by-step explanation for how to connect Bluetooth devices to Windows laptops running Windows 10 or Windows 11. It also includes troubleshooting tips for common issues you may encounter.

    Let’s walk through the entire process.

    What You Need Before You Start

    Before pairing any Bluetooth device with your Windows laptop, make sure:

    • Your laptop supports Bluetooth. Most modern laptops have it built-in.
    • The Bluetooth device is charged or has fresh batteries.
    • The device is in pairing mode and is discoverable.
    • You are running Windows 10 or 11 with the latest updates.

    How to Check if Your Laptop Has Bluetooth

    Not sure if your laptop has Bluetooth? Here’s how to check:

    Method 1: Using Device Manager

    1. Press Windows + X and select Device Manager.
    2. Look for a Bluetooth category in the list.
    3. If available, your laptop supports Bluetooth.

    Method 2: Settings Menu

    1. Open Settings (Press Windows + I).
    2. Go to Devices > Bluetooth & other devices.
    3. If you see a toggle switch for Bluetooth, it is available.

    If Bluetooth is missing, check your laptop model’s specs. You may need to install a USB Bluetooth adapter.

    Step-by-Step: How to Connect Bluetooth Devices to Windows Laptop

    Step 1: Turn on Bluetooth on Your Laptop

    Windows 10:

    • Open Settings > Devices > Bluetooth & other devices.
    • Toggle Bluetooth switch to On.

    Windows 11:

    • Open Settings > Bluetooth & devices.
    • Turn on Bluetooth toggle at the top.

    Alternatively, you can turn on Bluetooth from the Quick Settings panel:

    • Click the network/sound/battery icons on the taskbar.
    • Click the Bluetooth icon to enable it.

    Step 2: Put Your Bluetooth Device in Pairing Mode

    This step varies by device:

    • Bluetooth headphones or earbuds: Usually, hold the power or Bluetooth button until the LED starts flashing.
    • Speakers: Press and hold the Bluetooth button until a tone or blinking light indicates pairing mode.
    • Keyboards and mice: There may be a dedicated pairing button or it will enter pairing mode when turned on for the first time.

    Check the manual for exact instructions for your device.

    Step 3: Pair the Device with Your Laptop

    Windows 10:

    1. Go to Settings > Devices > Bluetooth & other devices.
    2. Click Add Bluetooth or other device.
    3. Select Bluetooth.
    4. Windows will scan and list available devices.
    5. Click your device from the list.
    6. If prompted, confirm the passcode or PIN.

    Windows 11:

    1. Go to Settings > Bluetooth & devices.
    2. Click Add device at the top right.
    3. Choose Bluetooth.
    4. Wait for your device to appear, then click it to pair.

    Once connected, the device will show as Connected or Paired.

    How to Reconnect Paired Bluetooth Devices

    Once paired, devices typically reconnect automatically when both are powered on and within range. If not:

    1. Ensure Bluetooth is enabled on the laptop and device.
    2. Go to Settings > Bluetooth & devices.
    3. Click the device name and choose Connect if needed.

    How to Remove or Unpair a Bluetooth Device

    If you no longer need the connection:

    1. Open Settings > Bluetooth & devices.
    2. Find the device under Paired Devices.
    3. Click the three-dot menu (Windows 11) or select the device (Windows 10).
    4. Choose Remove device.

    You can now re-pair the device whenever needed.

    Troubleshooting Common Bluetooth Issues

    1. Device Not Showing in List
    • Ensure the device is in pairing mode.
    • Restart both laptop and Bluetooth device.
    • Move the device closer to the laptop.
    • Toggle Bluetooth off and on again.
    1. Can’t Connect to Paired Device
    • Unpair the device and re-pair it.
    • Check if the device is connected to another system (like your phone).
    • Remove old Bluetooth devices that might be interfering.
    1. Bluetooth Is Missing from Laptop
    • Reinstall Bluetooth drivers:
      • Open Device Manager.
      • Right-click on Bluetooth adapter > Uninstall device.
      • Restart your laptop. Windows will reinstall it automatically.
    • Update your system via Settings > Update & Security.
    1. Audio Issues with Bluetooth Headphones
    • Set the Bluetooth device as the default playback device:
      • Right-click on the volume icon > Sound settings.
      • Select your Bluetooth headphones under Output device.
    • Ensure the audio profile is set correctly (e.g., stereo mode, not hands-free).

    Tips from My Personal Experience

    As someone who uses multiple Bluetooth devices daily—from a wireless mouse to earbuds—I’ve found that:

    • Keeping your device drivers updated reduces connection issues.
    • For frequently used devices, pin them in your Quick Settings for faster access.
    • Restarting Bluetooth services can resolve temporary bugs:
      • Press Windows + R, type services.msc, and press Enter.
      • Find Bluetooth Support Service, right-click, and choose Restart.

    Advanced Tip: Use Bluetooth File Transfer

    You can also send and receive files via Bluetooth:

    1. Go to Settings > Bluetooth & devices.
    2. Click Send or receive files via Bluetooth.
    3. Choose Send files or Receive files.
    4. Follow on-screen instructions.

    This is useful when transferring small files from your smartphone to your laptop without a USB cable.

    Summary: Key Steps to Remember

    Step Action
    1 Check if Bluetooth is available
    2 Enable Bluetooth from Settings or Quick Panel
    3 Put your device in pairing mode
    4 Use “Add Bluetooth Device” to pair
    5 Confirm connection
    6 Reconnect or remove when needed

    Conclusion

    Connecting Bluetooth devices to a Windows laptop is a simple process once you know where to look. Whether you’re on Windows 10 or Windows 11, the steps remain mostly the same. Just enable Bluetooth, pair the device, and you’re ready to go.

    By following the detailed instructions in this guide, you can connect wireless headphones, speakers, mice, keyboards, and more with ease. If problems arise, the built-in tools and troubleshooting steps provided should help resolve them quickly.

    Mastering Bluetooth connectivity is essential for a modern, wireless computing experience.

  • How to Partition a Hard Drive Without Losing Data

    How to Partition a Hard Drive Without Losing Data

    Partitioning a hard drive allows you to organize data, install multiple operating systems, or separate files without affecting existing data. This guide provides step-by-step instructions to partition your hard drive safely using built-in Windows tools and third-party software.

    Why Partition a Hard Drive?

    Partitioning can help:

    • Organize Data: Separate system files from personal data.
    • Multiple Operating Systems: Install different OSes on separate partitions.
    • Backup and Recovery: Simplify data backup processes.

    Method 1: Using Windows Disk Management

    Windows includes a built-in tool called Disk Management for partitioning.

    Steps:

    1. Open Disk Management:
      • Press Windows + X and select Disk Management.
    2. Shrink Existing Partition:
      • Right-click on the drive you want to partition (e.g., C:) and select Shrink Volume.
      • Enter the amount to shrink in MB and click Shrink.
    3. Create New Partition:
      • Right-click on the unallocated space and select New Simple Volume.
      • Follow the wizard to assign a drive letter and format the partition.

    Note: Disk Management cannot shrink FAT32 or exFAT partitions.

    Method 2: Using MiniTool Partition Wizard

    MiniTool Partition Wizard is a free third-party tool offering advanced partitioning features.

    Steps:

    1. Download and Install:
      • Visit the official MiniTool website and download the free version.
    2. Launch the Application:
      • Open MiniTool Partition Wizard.
    3. Select Partition to Resize:
      • Right-click on the desired partition and choose Move/Resize.
    4. Adjust Partition Size:
      • Drag the slider to resize the partition and click OK.
    5. Apply Changes:
      • Click Apply to execute the pending operations.

    Advantages:

    • Supports both NTFS and FAT32 partitions.
    • Can extend partitions even if unallocated space is not adjacent.

    Method 3: Using AOMEI Partition Assistant

    AOMEI Partition Assistant is another free tool with user-friendly features.

    Steps:

    1. Download and Install:
      • Visit the official AOMEI website and download the Standard Edition.
    2. Launch the Application:
      • Open AOMEI Partition Assistant.
    3. Select Partition to Resize:
      • Right-click on the desired partition and choose Resize/Move Partition.
    4. Adjust Partition Size:
      • Drag the slider to resize the partition and click OK.
    5. Apply Changes:
      • Click Apply to execute the pending operations.

    Features:

    • Supports creating, resizing, and merging partitions.
    • Offers a bootable media builder for advanced operations.

    Precautions Before Partitioning

    • Backup Data: Always back up important data before modifying partitions.
    • Check Disk Health: Ensure the hard drive is functioning properly.
    • Power Supply: Use a reliable power source to prevent interruptions.

    Conclusion

    Partitioning a hard drive without losing data is achievable using Windows Disk Management or third-party tools like MiniTool Partition Wizard and AOMEI Partition Assistant. Always ensure data is backed up and follow the steps carefully to avoid data loss.

  • How to Increase Font Size in Windows settings

    How to Increase Font Size in Windows settings

    Increasing the font size in Windows can significantly enhance readability and reduce eye strain, especially for users with visual impairments or those working on high-resolution displays. Whether you’re using Windows 10 or Windows 11, the operating system provides built-in settings to adjust text size to your preference. This guide will walk you through the steps to increase font size in Windows settings, ensuring a more comfortable computing experience.

    How to Increase Font Size in Windows 11

    Step 1: Access Accessibility Settings

    • Click on the Start menu and select Settings.
    • In the Settings window, choose Accessibility from the sidebar.

    Step 2: Adjust Text Size

    • Under the Vision section, click on Text size.
    • You’ll see a slider labeled Text size. Drag the slider to the right to increase the font size.
    • As you move the slider, a preview will show how the text will appear.
    • Once satisfied, click Apply to implement the changes.

    Note: Adjusting the text size will affect most system text, but some applications may not reflect the change.

    Step 3: Adjust Overall Scaling (Optional)

    • If you wish to increase the size of apps and other items along with text:
      • Go back to Accessibility settings.
      • Click on Display under the Vision section.
      • Under Scale & layout, choose a scaling percentage higher than 100% from the dropdown menu.

    Note: Increasing the scaling percentage will enlarge all items on the screen, including text, apps, and icons.

    How to Increase Font Size in Windows 10

    Step 1: Open Ease of Access Settings

    • Right-click on the desktop and select Display settings.
    • In the Display settings window, scroll down and click on Ease of Access.

    Step 2: Make Text Bigger

    • Under the Display section, you’ll find a slider labeled Make text bigger.
    • Drag the slider to the right to increase the font size.
    • A sample text will show how the adjusted size looks.
    • Click Apply to save the changes.

    Step 3: Adjust Overall Scaling (Optional)

    • To increase the size of apps and other items along with text:
      • In the Display settings, under Scale and layout, choose a scaling percentage higher than 100% from the dropdown menu.

    Note: Similar to Windows 11, increasing the scaling percentage will enlarge all items on the screen.

    Additional Tips

    • Use Magnifier: For temporary zooming, Windows offers a built-in Magnifier tool. Press Windows + Plus (+) to activate it. Press Windows + Esc to turn it off.
    • Custom Scaling: If predefined scaling options don’t suit your needs, you can set a custom scaling percentage:
      • In Display settings, under Scale and layout, click on Advanced scaling settings.
      • Enter a custom scaling size between 100% and 500%, then click Apply.
      • Sign out and sign back in to apply the changes.
    • Third-Party Tools: For more granular control over font sizes, consider using third-party applications like Winaero Tweaker. These tools offer advanced customization options but should be used with caution.

    Personal Experience

    As someone who spends extended hours in front of a computer screen, adjusting the font size has been crucial for reducing eye fatigue. On my Windows 11 laptop, increasing the text size to 125% provided a noticeable improvement in readability without compromising the overall layout. It’s a simple adjustment that makes a significant difference in daily computing tasks.

    Conclusion

    Adjusting the font size in Windows is a straightforward process that can greatly enhance your user experience. Whether you’re aiming for better readability or accommodating visual preferences, Windows 10 and 11 offer built-in settings to help you customize text size to your liking. Remember to explore both text size and overall scaling options to find the perfect balance for your needs.

  • How to Check for and Install Windows Updates manually

    How to Check for and Install Windows Updates manually

    Keeping your Windows operating system up to date is crucial for security, performance, and accessing new features. While Windows typically handles updates automatically, there are times when manually checking for and installing updates is necessary. This guide provides detailed steps to manually check for and install updates on Windows 11.

    Why Manually Update Windows 11?

    Manually updating Windows 11 can be beneficial in several scenarios:

    • Immediate Access to Updates: When you want the latest features or security patches without waiting for automatic updates.
    • Troubleshooting: If automatic updates fail or cause issues, manual updates can help resolve problems.
    • Controlled Environment: In environments where updates need to be tested before deployment.

    Method 1: Using Windows Settings

    The most straightforward way to check for updates is through the Settings app.

    Steps:

    1. Open Settings:
      • Press Windows + I to open the Settings app.
    2. Navigate to Windows Update:
      • Click on Windows Update in the left-hand menu.
    3. Check for Updates:
      • Click the Check for updates button.
      • Windows will search for available updates.
    4. Install Updates:
      • If updates are found, click Download & install.
      • Follow any on-screen instructions.
    5. Restart if Required:
      • Some updates may require a restart.
      • Save your work and click Restart now when prompted.

    Method 2: Using Microsoft Update Catalog

    For specific updates or offline installations, the Microsoft Update Catalog is useful.

    Steps:

    1. Visit the Catalog:
      • Go to
    2. Search for the Update:
      • Enter the Knowledge Base (KB) number of the update (e.g., KB5006674) in the search bar.
    3. Download the Update:
      • Find the appropriate update for your system architecture (e.g., x64) and click Download.
    4. Install the Update:
      • Once downloaded, open the .msu file to start the installation.
      • Follow the on-screen instructions.
    5. Restart if Necessary:
      • After installation, restart your computer if prompted.

    Method 3: Using Command Prompt

    Advanced users can install updates via the Command Prompt.

    Steps:

    1. Open Command Prompt as Administrator:
      • Press Windows + S, type cmd, right-click on Command Prompt, and select Run as administrator.
    2. Install the Update:
      • Use the Windows Update Standalone Installer (wusa) with the following command:

    mathematica

    CopyEdit

    wusa C:\Path\To\Update.msu /quiet /norestart

      • Replace C:\Path\To\Update.msu with the actual path to your downloaded update file.
    1. Verify Installation:
      • To check if the update was installed, run:

    lua

    CopyEdit

    wmic qfe list brief /format:table

    1. Restart Your Computer:
      • Some updates may require a restart to take effect.

    Method 4: Using PowerShell

    PowerShell offers another method for managing updates.

    Steps:

    1. Open PowerShell as Administrator:
      • Press Windows + S, type PowerShell, right-click on Windows PowerShell, and select Run as administrator.
    2. Install the PSWindowsUpdate Module:
      • Run the following command:

    mathematica

    CopyEdit

    Install-Module PSWindowsUpdate

      • If prompted, confirm the installation.
    1. Check for Updates:
      • To list available updates, run:

    sql

    CopyEdit

    Get-WindowsUpdate

    1. Install Updates:
      • To install all available updates, run:

    mathematica

    CopyEdit

    Install-WindowsUpdate

    1. Restart if Required:
      • After installation, restart your computer if necessary.

    Additional Tips

    • Ensure Internet Connectivity: A stable internet connection is essential for downloading updates.
    • Backup Important Data: Before installing major updates, back up your data to prevent potential loss.
    • Regularly Check for Updates: Even if automatic updates are enabled, periodically check for updates to ensure your system is current.
    • Use Windows Update Troubleshooter: If you encounter issues, the built-in troubleshooter can help identify and fix problems.

    Conclusion

    Manually checking for and installing Windows 11 updates is a straightforward process that ensures your system remains secure and up to date. Whether through Settings, the Microsoft Update Catalog, Command Prompt, or PowerShell, you have multiple methods to manage updates effectively. Regular maintenance and updates contribute to a smoother and more secure computing experience.

  • How to Upgrade Ram Usage Settings in Windows

    How to Upgrade Ram Usage Settings in Windows

    If your Windows PC feels sluggish or you’re encountering memory-related errors, optimizing your system’s RAM usage settings can enhance performance. This guide provides step-by-step instructions to adjust RAM settings in Windows 10 and 11.

    Understanding RAM Usage in Windows

    RAM (Random Access Memory) is vital for running applications and processes. Windows manages RAM dynamically, but manual adjustments can improve performance, especially for resource-intensive tasks.

    Method 1: Adjust Virtual Memory (Paging File)

    Virtual memory uses disk space to simulate additional RAM. Adjusting its size can help when physical RAM is insufficient.

    Steps:

    1. Open System Properties:
      • Press Win + R, type sysdm.cpl, and press Enter.
    2. Access Performance Settings:
      • In the System Properties window, go to the Advanced tab.
      • Under Performance, click Settings.
    3. Modify Virtual Memory:
      • In the Performance Options window, go to the Advanced tab.
      • Under Virtual memory, click Change.
    4. Set Custom Size:
      • Uncheck Automatically manage paging file size for all drives.
      • Select your system drive (usually C:).
      • Choose Custom size and set:
        • Initial size (MB): 1.5 times your RAM size.
        • Maximum size (MB): 3 times your RAM size.
      • Click Set, then OK.
    5. Restart Your PC:
      • For changes to take effect, restart your computer.

    Method 2: Allocate More RAM to Specific Applications

    Prioritizing RAM for certain applications can enhance their performance.

    Steps:

    1. Open Task Manager:
      • Press Ctrl + Shift + Esc.
    2. Navigate to Details Tab:
      • Click on the Details tab.
    3. Set Priority:
      • Right-click on the desired application.
      • Hover over Set priority and choose High or Realtime.
      • Confirm the change when prompted.

    Note: Setting priority to Realtime can affect system stability; use with caution.

    Method 3: Enable XMP in BIOS for RAM Overclocking

    If your system supports XMP (Extreme Memory Profile), enabling it can allow RAM to run at higher speeds.

    Steps:

    1. Access BIOS/UEFI:
      • Restart your PC and press the BIOS key (commonly Del, F2, or F10) during boot.
    2. Enable XMP:
      • Navigate to the memory settings section.
      • Find the XMP option and enable it.
      • Save changes and exit BIOS.

    Note: Not all systems support XMP; consult your motherboard’s manual.

    Method 4: Disable Unnecessary Startup Programs

    Reducing startup programs can free up RAM and speed up boot times.

    Steps:

    1. Open Task Manager:
      • Press Ctrl + Shift + Esc.
    2. Navigate to Startup Tab:
      • Click on the Startup tab.
    3. Disable Unnecessary Programs:
      • Right-click on programs you don’t need at startup and select Disable.

    Method 5: Scan for Malware

    Malware can consume RAM and degrade performance. Regular scans help maintain system health.

    Steps:

    1. Open Windows Security:
      • Go to Settings > Update & Security > Windows Security.
    2. Run a Full Scan:
      • Click on Virus & threat protection.
      • Select Scan options and choose Full scan.
      • Click Scan now.

    Additional Tips

    • Upgrade Physical RAM: If possible, adding more RAM can significantly boost performance.
    • Close Unused Applications: Regularly close programs not in use to free up RAM.
    • Keep System Updated: Ensure Windows and drivers are up to date for optimal performance.

    Conclusion

    Optimizing RAM usage in Windows involves adjusting virtual memory, prioritizing applications, managing startup programs, and ensuring system health. Implementing these steps can lead to a more responsive and efficient computing experience.