A slow startup can be one of the most frustrating issues for any Windows user. What begins as a quick boot-up time often deteriorates over months or years, leaving you waiting minutes instead of seconds to access your desktop. This sluggishness typically stems from a combination of factors, including:
- Excessive Startup Programs: Many applications automatically configure themselves to launch with Windows, consuming valuable system resources (CPU, RAM, disk I/O) from the moment your PC powers on.
- Fragmented or Full Storage Drives: Especially on traditional Hard Disk Drives (HDDs), fragmented data can slow down read times during boot. Solid State Drives (SSDs), while faster, can also see performance degradation if they are nearly full.
- Outdated or Corrupted Drivers: Device drivers are critical software components that allow your hardware to communicate with Windows. Outdated or corrupted drivers can cause conflicts and delays during startup.
- Windows Updates and System Files: Sometimes, incomplete updates or corrupted system files can lead to prolonged boot sequences as Windows tries to resolve issues.
- Power Settings: Incorrect power management settings can sometimes interfere with optimal startup performance.
- Malware or Bloatware: Malicious software or unnecessary pre-installed applications (bloatware) can run hidden processes that bog down your system.
The good news is that for most cases of slow startup, you don’t need to be a tech expert or download complex third-party tools. Both Windows 10 and Windows 11 provide a robust set of built-in features and settings that allow you to diagnose and fix these issues, restoring your PC to its former speed.
This guide will walk you through systematic steps to identify and resolve slow startup problems on your Windows 11 or Windows 10 computer.
Method 1: Managing Startup Programs (Most Effective)
The single biggest culprit for slow boot times is often an excessive number of applications launching automatically.
- Open Task Manager:
- Press Ctrl + Shift + Esc on your keyboard.
- Alternatively, right-click on the Start button and select “Task Manager.”
- Navigate to the “Startup” Tab:
- In Task Manager, click on the “Startup” tab (in Windows 10) or “Startup apps” tab (in Windows 11).
- Identify and Disable Unnecessary Apps:
- Review the list of applications that launch with Windows.
- Pay close attention to the “Startup impact” column (in Windows 10) or “Impact” column (in Windows 11). Apps labeled “High” have the most significant effect on boot time.
- For any application you don’t absolutely need running immediately after you log in (e.g., game launchers like Steam, communication apps like Discord, cloud sync services you don’t use constantly, Spotify, Adobe Creative Cloud apps), right-click on its entry and select “Disable.”
- Crucially: Avoid disabling critical system processes, your antivirus software, or essential drivers. If you’re unsure about an app, search for its name online.
Method 2: Adjusting Power Options and Disabling Fast Startup
While “Fast Startup” is designed to make your PC boot quicker, it can sometimes cause issues or conflicts, leading to longer boot times or problems for some users. It’s worth testing if disabling it helps.
- Access Power Options:
- In Windows 11: Right-click on the Start button > “Settings” > “System” > “Power & battery.” Scroll down and click on “Power mode” or “Additional power settings.”
- In Windows 10: Right-click on the Start button > “Power Options” (or go to Settings > System > Power & sleep > Additional power settings).
- Choose What Power Buttons Do:
- In the Power Options window, click “Choose what the power buttons do” on the left-hand pane.
- Disable Fast Startup:
- Click “Change settings that are currently unavailable.” (You may need Administrator privileges).
- Scroll down and uncheck the box next to “Turn on fast startup (recommended).”
- Click “Save changes.”
- Test: Restart your PC and observe if the boot time has improved.
Method 3: Updating Drivers and Windows
Outdated or corrupted drivers can cause system instability and slow down the boot process. Keeping your Windows operating system updated is also crucial for performance improvements and bug fixes.
- Update Device Drivers:
- Graphics Drivers: These are often a source of boot issues. Visit the website of your graphics card manufacturer (NVIDIA, AMD, Intel) and download the latest drivers for your specific model.
- Other Drivers:
- Search for “Device Manager” in the Windows Search bar and open it.
- Expand categories (e.g., “Display adapters,” “Network adapters,” “Sound, video and game controllers”).
- Right-click on a device and select “Update driver.” Choose “Search automatically for drivers.” If that doesn’t find it, visit your laptop/motherboard manufacturer’s support website and download the latest drivers for your model.
- Check for Windows Updates:
- Windows 11: Go to Settings > Windows Update. Click “Check for updates.”
- Windows 10: Go to Settings > Update & Security > Windows Update. Click “Check for updates.”
- Install any pending updates and restart your PC as prompted.
Method 4: Cleaning Up and Optimizing Storage Drives
A cluttered or fragmented hard drive, or a nearly full SSD, can lead to slower boot times.
- Run Disk Cleanup:
- This tool helps remove temporary files, system logs, and other unnecessary data.
- Press Windows key + R to open the Run dialog.
- Type cleanmgr and press Enter.
- Select your C: drive (or the drive where Windows is installed) and click “OK.”
- Click “Clean up system files” for a more thorough scan.
- Select all the file types you wish to remove (especially “Temporary files,” “Downloads,” “Recycle Bin,” and “Windows Update Cleanup”).
- Click “OK” and then “Delete Files.”
- Optimize Drives (Defragment/Trim):
- For HDDs (Hard Disk Drives): Defragmentation organizes fragmented data, improving access speeds.
- For SSDs (Solid State Drives): The “Optimize Drives” tool performs TRIM, which helps maintain SSD performance over time. Windows usually schedules this automatically.
- How to: Search for “Defragment and Optimize Drives” in the Windows Search bar and open it.
- Select your C: drive.
- Click “Optimize.” You can also check “Change settings” to adjust the automatic optimization schedule.
Method 5: Disabling Unnecessary Services
Some Windows services might be running automatically but aren’t essential for your daily use, consuming resources during startup. Use caution here, as disabling critical services can cause system instability.
- Open Services Manager:
- Press Windows key + R to open the Run dialog.
- Type services.msc and press Enter.
- Identify Non-Essential Services:
- Review the list of services. Look for services that are set to “Automatic” but are not critical for your system or apps you frequently use.
- Examples of potentially safe services to disable (after research): Fax, Print Spooler (if you don’t print), Secondary Logon, Xbox services (if you don’t game on PC).
- Always research a service before disabling it. Incorrectly disabling a service can cause serious system problems.
- Disable or Set to Manual:
- Right-click on the service you want to change.
- Select “Properties.”
- In the “Startup type” dropdown, change it from “Automatic” to “Manual” or “Disabled.”
- Click “Apply” and “OK.”
- If the service is currently running and you’ve set it to Manual/Disabled, you may also click “Stop” to stop it immediately.
Method 6: Checking for Malware
Malware or unwanted software can run hidden processes that severely impact startup and overall performance.
- Run a Full System Scan:
- Use Windows Security (formerly Windows Defender), which is built into Windows 10 and 11.
- How to: Search for “Windows Security” in the Windows Search bar and open it.
- Go to “Virus & threat protection.”
- Click “Scan options” and select “Full scan.”
- Click “Scan now” and allow the scan to complete. This can take a long time.
- If any threats are found, follow the instructions to remove them.
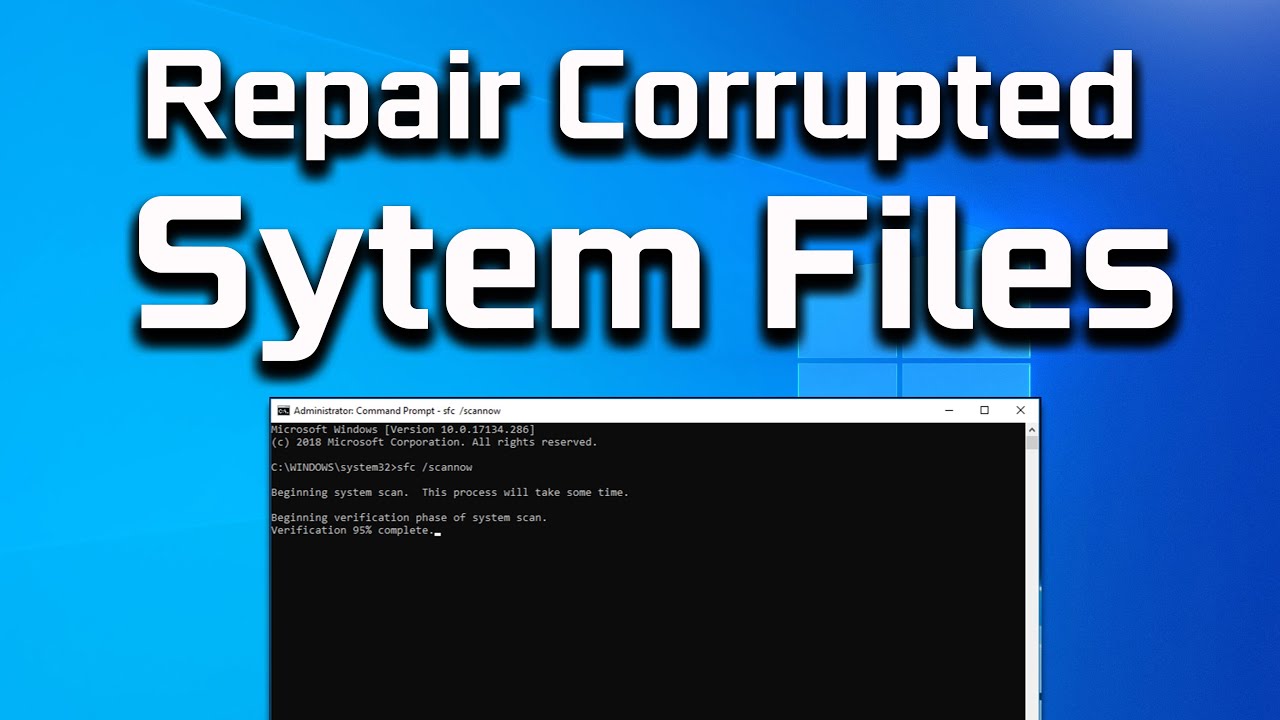
Method 7: System File Checker (SFC) and DISM Scans
Corrupted Windows system files can lead to instability and slow performance, including during startup.
- Open Command Prompt as Administrator:
- Search for “cmd” in the Windows Search bar.
- Right-click on “Command Prompt” and select “Run as administrator.”
- Run System File Checker (SFC):
- In the Command Prompt window, type sfc /scannow and press Enter.
- This tool scans for and repairs corrupted Windows system files. Let the scan complete (it can take some time).
- If it finds and fixes issues, you may be prompted to restart.
- Run Deployment Image Servicing and Management (DISM) Tool (If SFC fails):
- If SFC reports that it couldn’t fix certain files, run DISM.
- In the same Administrator Command Prompt, type the following commands one by one, pressing Enter after each:
- DISM /Online /Cleanup-Image /CheckHealth (Checks for corruption)
- DISM /Online /Cleanup-Image /ScanHealth (Performs a more advanced scan)
- DISM /Online /Cleanup-Image /RestoreHealth (Repairs corrupted files using Windows Update)
- This process can also take a while. After it completes, run sfc /scannow again.
Conclusion
A slow startup in Windows 11 or Windows 10 is a common but fixable issue. By systematically applying the built-in optimization tools and troubleshooting methods – from meticulously managing startup programs and updating drivers to cleaning up your storage and checking for malware – you can significantly reduce your boot time. Regular maintenance and being mindful of what programs launch automatically are key to keeping your PC performing optimally from the moment you press the power button.
FAQ Section
Q1: What is “Fast Startup” in Windows 11/10 and should I disable it?
Fast Startup (also known as “hybrid shutdown”) is a feature that combines aspects of a cold shutdown and hibernation. When you shut down your PC, it saves the system state to a hibernation file, allowing for a quicker boot-up. While often beneficial, it can sometimes cause issues with hardware or drivers, leading to longer boot times or other problems. If you’re experiencing slow startup, it’s worth trying to disable it (Method 2) to see if it improves your boot performance.
Q2: Will disabling startup apps delete them from my computer?
No, disabling startup apps only prevents them from launching automatically when Windows starts. It does not uninstall the applications or delete any of their files. You can still open and use these applications manually whenever you need them.
Q3: How do I know which startup apps are safe to disable?
When reviewing the “Startup apps” tab in Task Manager, look for familiar applications you installed (e.g., game launchers, messaging apps, cloud sync clients you don’t need constantly running). Windows also provides an “Impact” column (Windows 11) or “Startup impact” (Windows 10) that helps identify resource-heavy apps. Generally, avoid disabling anything related to your operating system, security software (antivirus), or essential hardware drivers unless you are absolutely sure what it does. When in doubt, search for the app’s name online.
Q4: Does upgrading from an HDD to an SSD significantly improve startup time?
Yes, upgrading from a traditional Hard Disk Drive (HDD) to a Solid State Drive (SSD) for your operating system is arguably the most impactful upgrade you can make to drastically improve startup times and overall system responsiveness. SSDs have no moving parts and offer significantly faster read/write speeds than HDDs.
Q5: What is the purpose of “Wipe Cache Partition” on phones versus “Disk Cleanup” on Windows?
While both clear temporary files, their scope and method differ. “Wipe Cache Partition” on a phone (Android) clears the system cache specifically for the Android OS, which can become corrupted after updates. Disk Cleanup (Windows) is a utility that removes various temporary files, downloaded program files, Recycle Bin contents, and old Windows Update files from your hard drive. They both aim to clear unneeded temporary data but operate on different system architectures.